
Making a Barn Quilt

We moved to South Carolina in 2021. I loved the area, loved the house, loved the soon-to-be she-shed, but hated the blank space above the garage doors. The big blank space created by the gable was just more than I could stand looking at every time I drove into the driveway. It was a lonely blank canvas begging for personality. It gave me the perfect reason to make my first "no kidding" barn quilt.
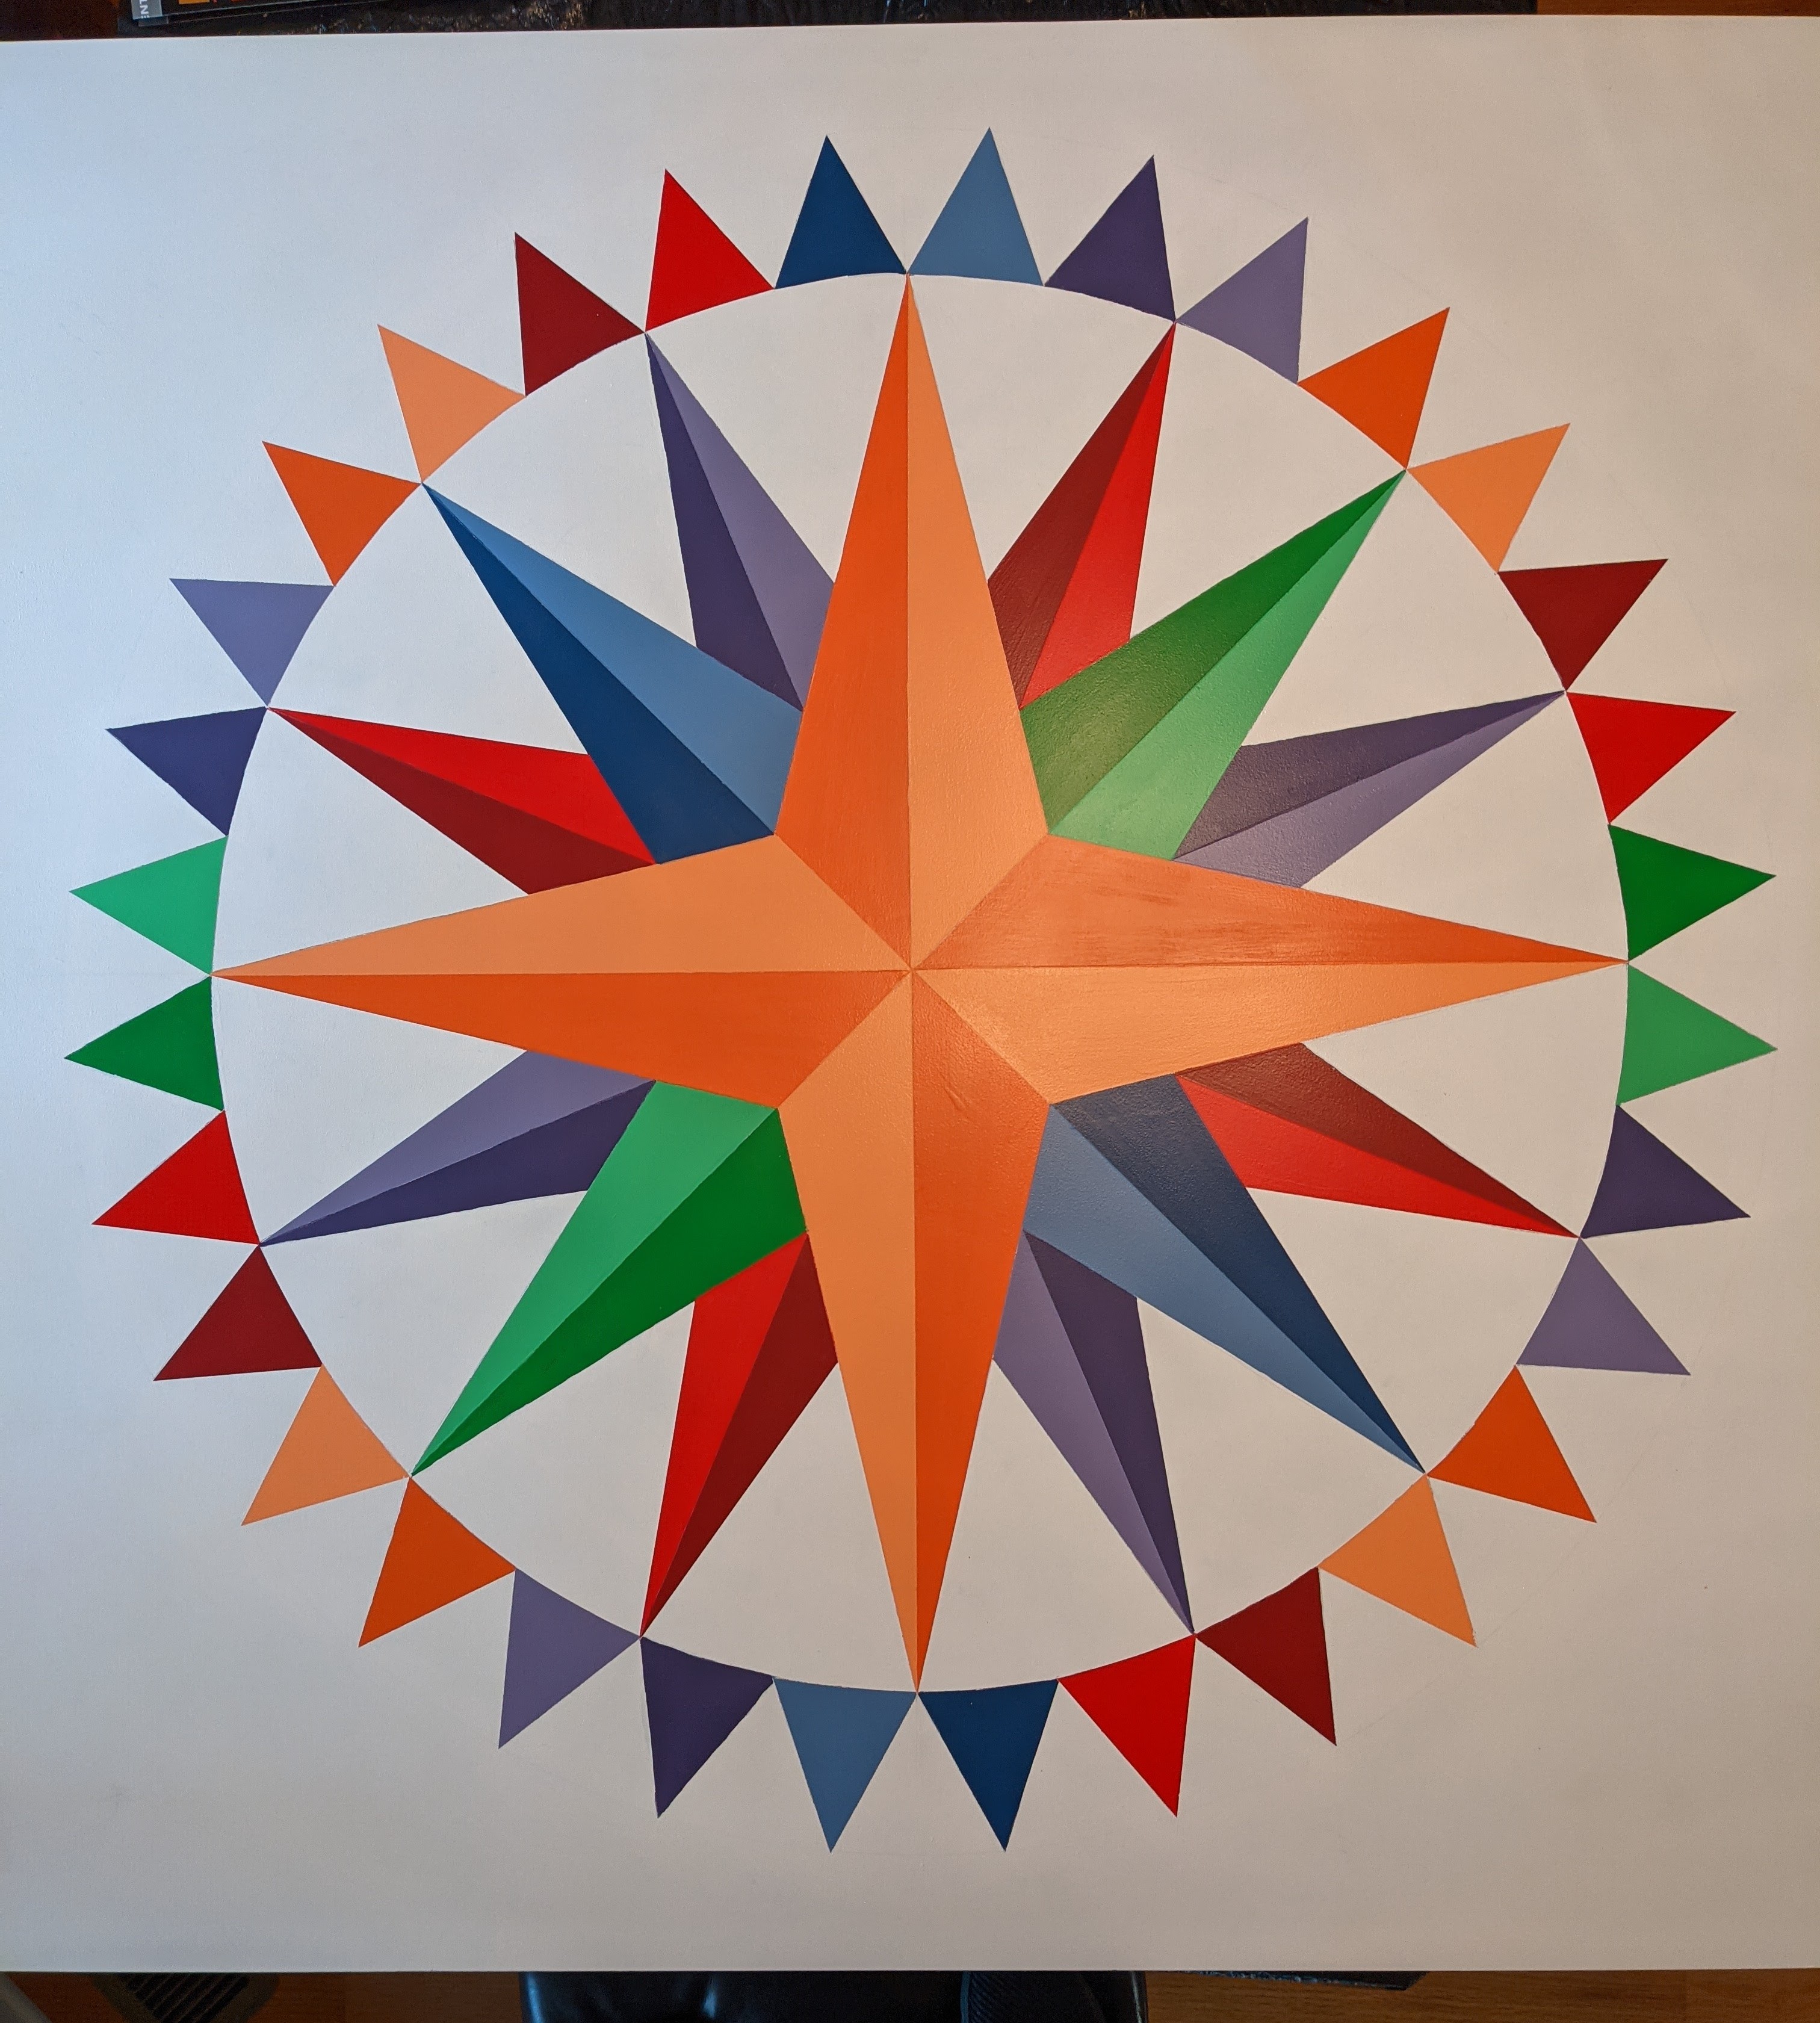
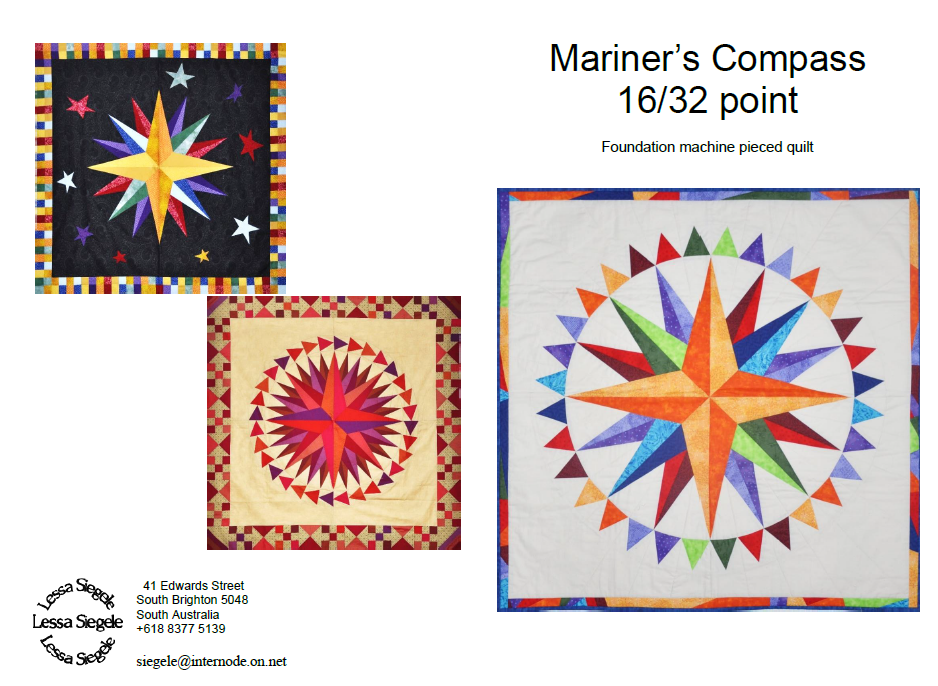
Now it was just deciding what pattern I wanted it to be. I looked everywhere and kept coming back to the compass. We love to travel and it just seemed appropriate for the house to be adorned with a compass - helping us find our way on our journeys and, most importantly, finding our way back home. So, now the only thing to decide on was which style/pattern to use. This led to many internet searches until I found this beauty. It's a gorgeous Mariners Compass (FPP pattern by Lessa Siegele) that I found on Etsy (2SewTextiles). It comes with 3 border designs but you've already seen which was my favorite. I loved everything about it - style, colors, everything. So I bought the pattern and set out to modify it to fit the barn quilt idea.
I decided I wanted the barn quilt to be 48 inches square. So the first thing was adapting the pattern. First thing I will tell you is that I didn't want to create this barn quilt pattern like so many others do. They create grids, use their geometry skills, and such to "freehand" the design. I had no interest in spending a couple of days trying to get this pattern right. So I decided I was going to trace it onto the board. So, I printed out the pieces (as many as I needed) to create each 1/2 of the compass. Then took them to a local printer that has wide-carriage scanner/printers. They were able to scan in my compass halves and then print them the size I needed for the barn quilt. Now I will tell you that this isn't a perfect solution. As you probably know, scanning and printing will cause distortions in the final printing. But that is easily overcome with a little fudging when you are working through the next steps. Once I got the printed halves home it was just a matter of transferring them onto the prepared board.
Tips & Tricks Notes - I need to stop a moment and tell you of the one mistake I made when I pieced my pattern pieces together. I didn't think long enough about the orientation of the compass and how I wanted it placed on my board. If you look closely at the pictures, you will see that I taped the pieces together so that when it was transferred to the board, the points of the center portion would be pointing to the 4 corners of the board. This is not want I wanted. This would have required the board to be centered on the wall and then hung "on point" which would have been more difficult for the guys to do. Fortunately, this pattern was easily modified by adding/erasing lines to move the center points to their desired orientation. This would have been a much bigger problem with some of the other patterns I had looked at. So please take a minute (or 20) to be sure you have your pattern oriented the way you need it before you proceed.
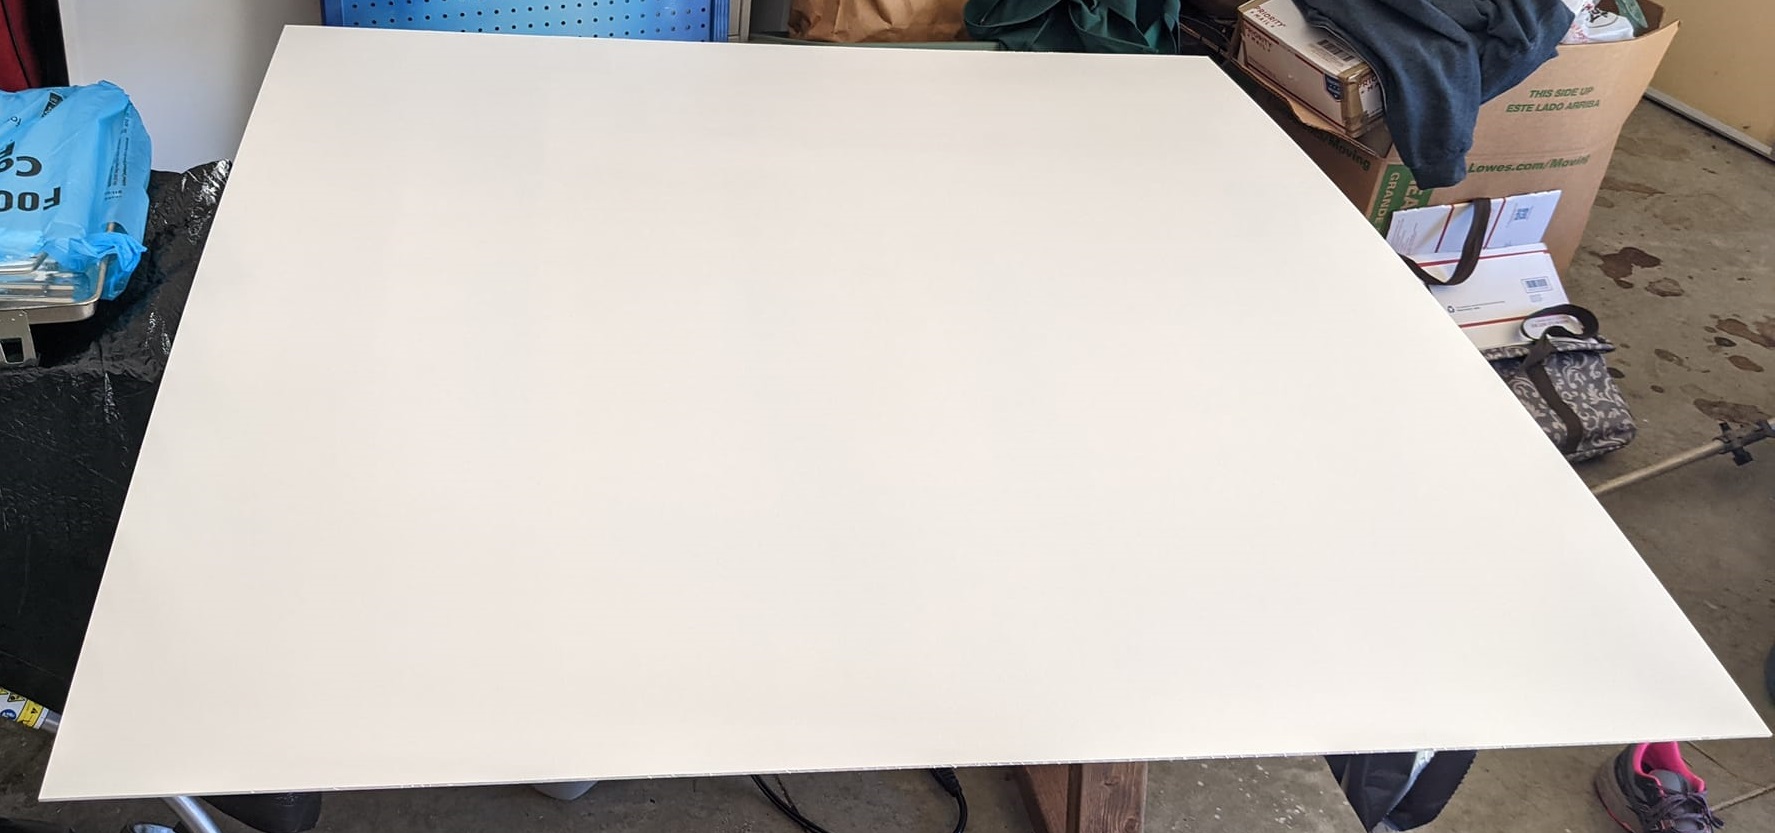
So let's back up to prepping the board. Since my barn quilt was going to be so large and would have to be hauled up a ladder and hung over vinyl siding, I decided I wanted to use lightweight ACM (aluminum composite material) rather than wood or MDF. ACM is used to create signs among other things. So I called around to some of the small sign makers in the area and found one that had a 4' x 4' piece that was left over and had been collecting dust in his garage. So a short road trip and $40 found that board in our truck and headed to my house. Next, was actually acquiring the materials to prep and paint the board.
I wanted the board to be rigid enough to withstand the rather gusty winds we get up here in the foothills. So I purchased some 1"x3" boards and cut them the lengths I needed to frame the "quilt". I added short pieces of 1"x3" at each joint as a bracket. This shored up the joint and provided a gap between the wall and the frame so rain & debris would not accumulate on the frame. I used short 3/4" sheet metal screws (spaced 6 inches apart all the way around the board) to affix the boards to the back of the ACM. I will admit that I spent a couple of days debating with myself on whether I wanted to create an actual frame that would be visible - or not. I decided that I like the idea of no frame much better. I would not have to worry about the wood warping or the paint peeling off the wood. So, now let's move on to painting.
I visited my local Benjamin Moore store to talk to them about the best way to prime the board. I love BM stores! They are usually owned by locals that don't mind answering questions and helping me find the best answer for me and my wallet. I have found they are much more knowledgeable than most people you will find at a big-box store. I purchased a paint-on primer they have that's made for using on aluminum. So, I painted on 2 coats of the primer. Then, I painted on 2 coats of white exterior satin enamel paint. The rest of the paints I used did come from a big-box store since it is closer to me and I needed so many colors in sample-size amounts. I will also tell you that the primer and base paint left the surface a little bumpy. Again, it's not that big of a deal, but it's not a smooth surface and you need to know that it's fine.
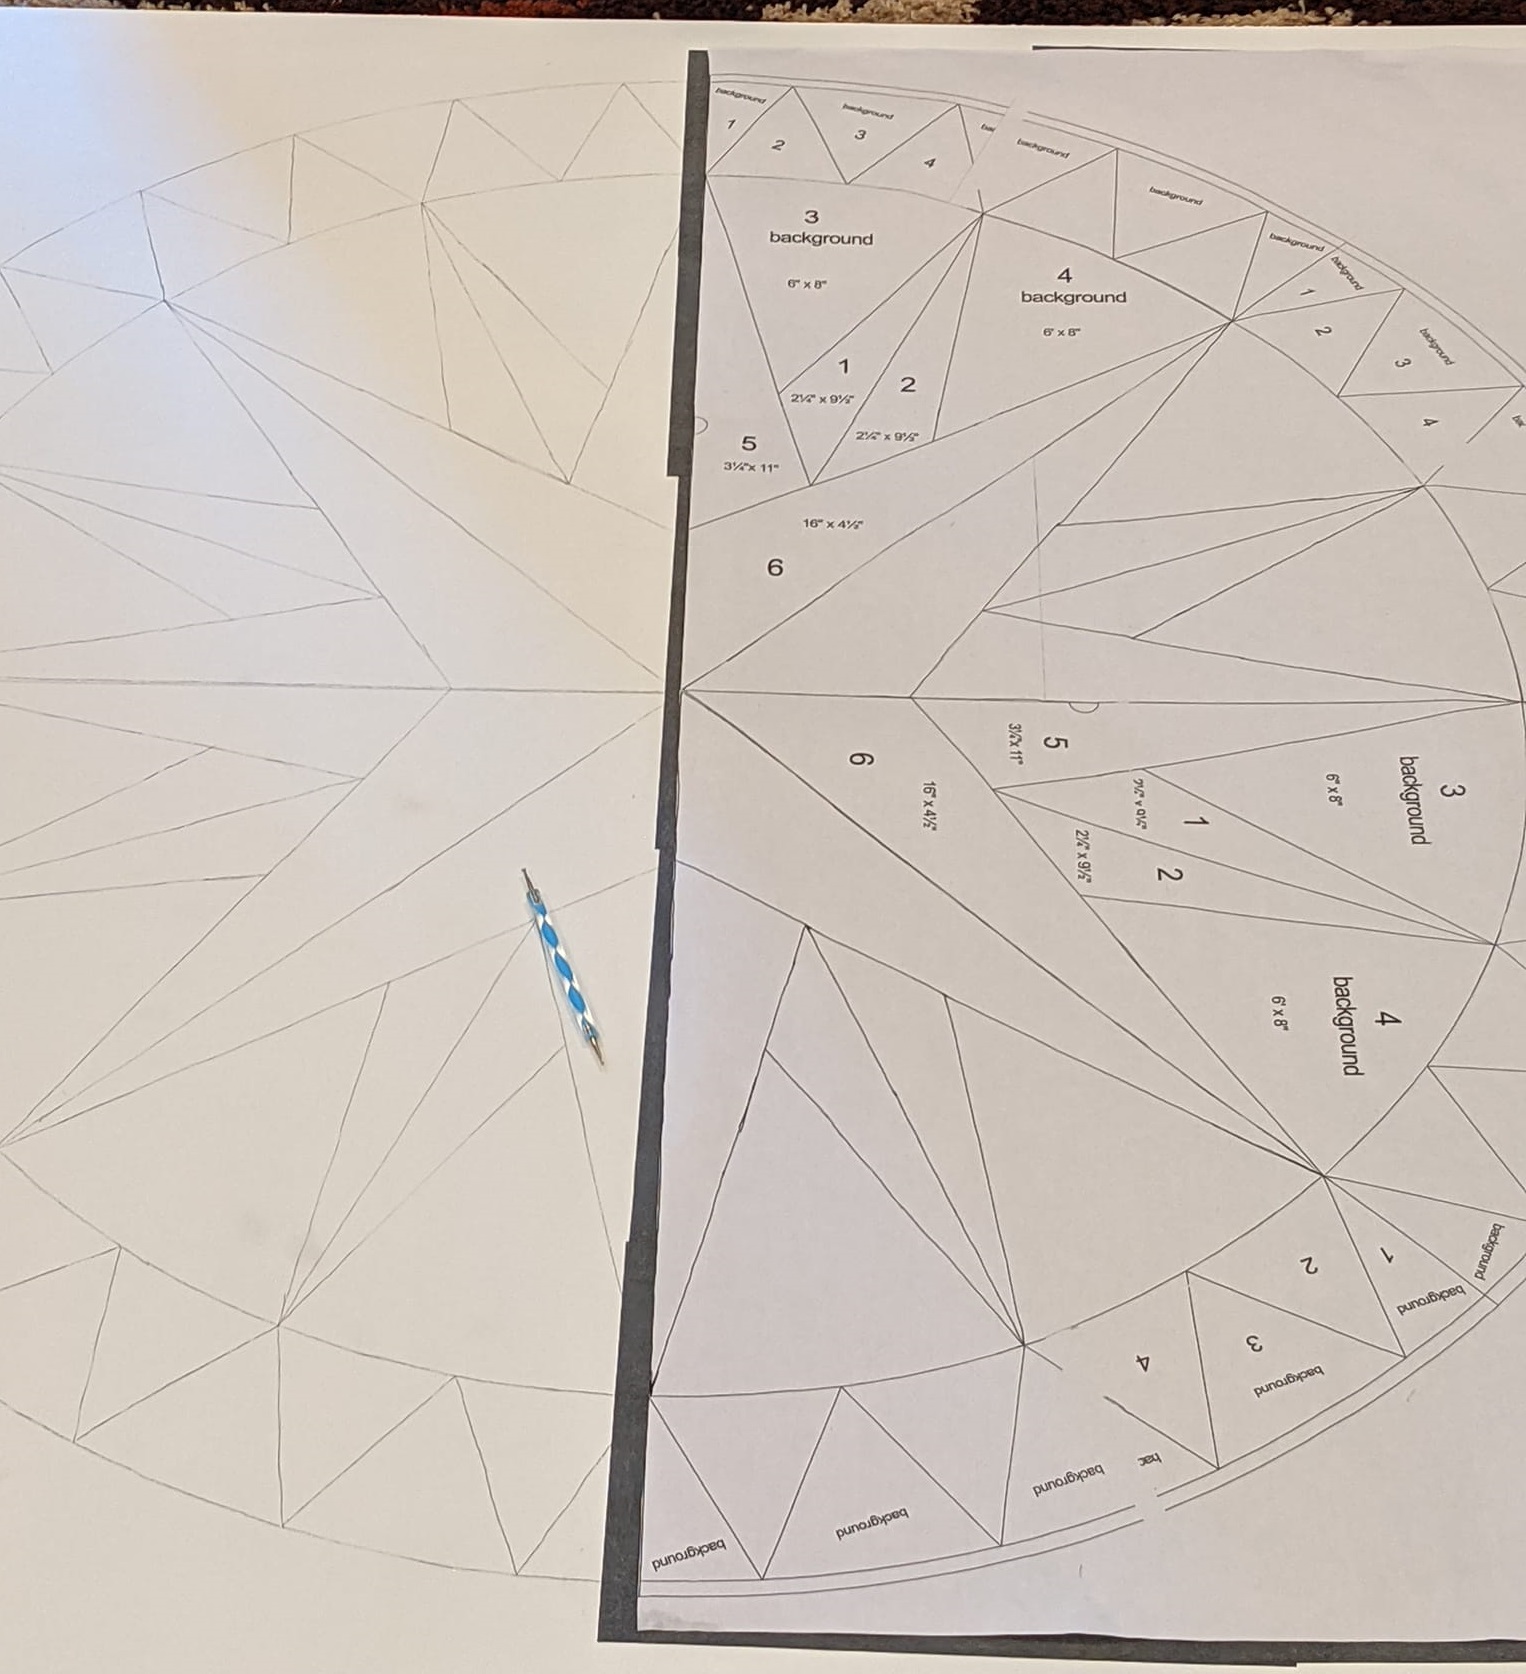
1st step was to make the center lines horizontally and vertically to help align the pattern. Here, I've traced the pattern on the left side and I'm getting the right side ready. I matched up the 2nd side, taped the outer edge, then folded it back and laid the carbon paper out under it. I used one of the wider tipped stylus that came with the carbon paper to trace the pattern. Note: I should not have traced the outer ring since I want going to paint between the triangles. I never could get the white paint to completely hide it.
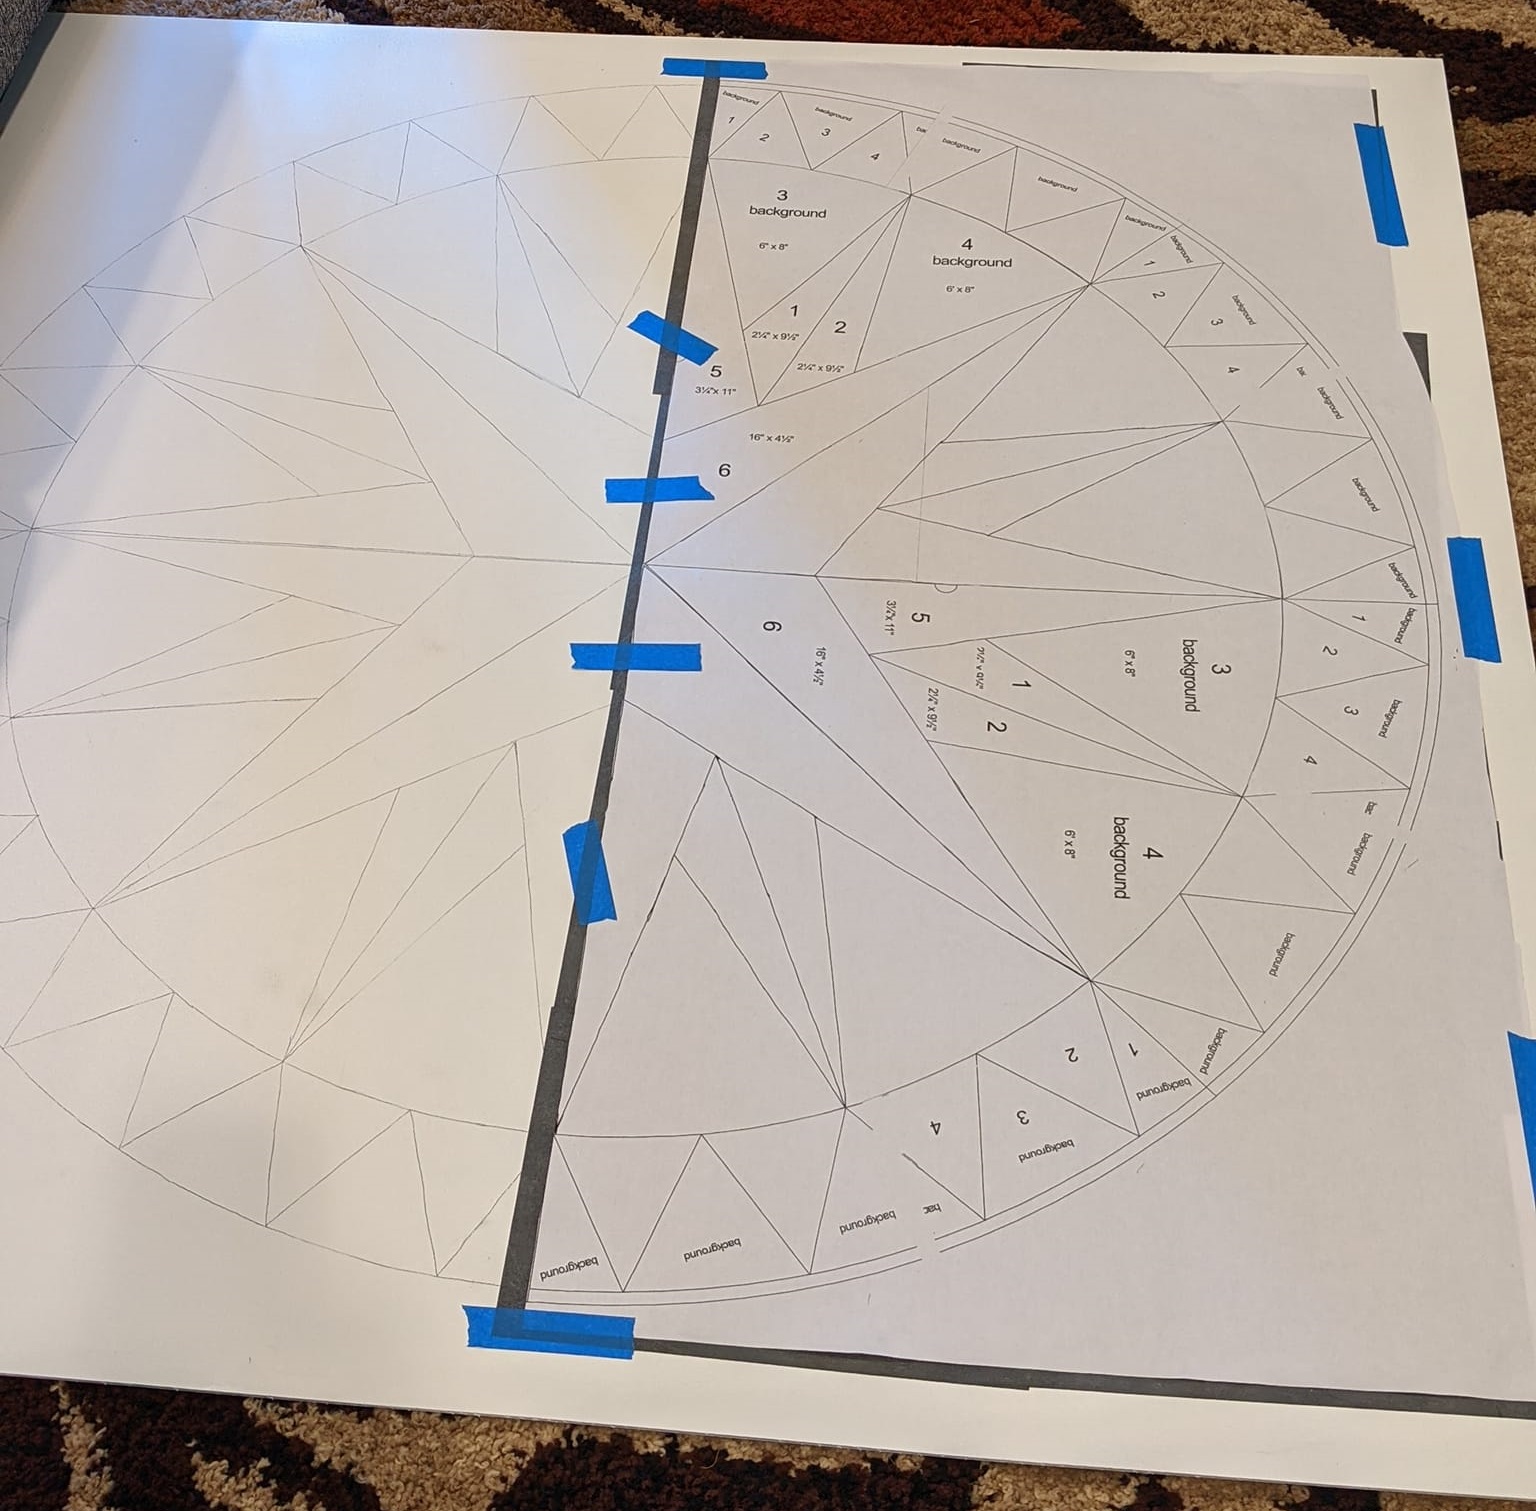
Right side is all taped down and ready to trace.
The next step was transferring the pattern onto the board. You'll see how I did it in the pictures. I purchased a bunch of carbon paper with stylus pens (from online). Then it was a matter of drawing my horizontal and vertical centering lines. This gave me a way to line up the printed halves of the compass. I carefully folded the first half of the pattern horizontally (bottom to top) making sure to get the opposing points to line up. Then I creased the inner and outer edges so that I could use those creases (also, you can use a pencil to mark them) to line up with the horizontal marking on the board. So, once I lined up the pattern piece vertically and horizontally, I used painters tape to hold it in place but only on one side. Then folded the paper back and laid several pieces of carbon paper down to cover all the area that I would be tracing. Then it was a simple matter of using the wider stylus pen to trace the pattern so the carbon paper would transfer it onto the board. Once the first side was traced out, I removed it and lined up the 2nd side of the pattern and repeated the process. Then I realized my mistake and made the adjustments I related earlier. I also traced the outer circle around the ring of points. It was not necessary since this was getting painted (not recreated in fabric). So, once again, learn from my mistake. Only trace the lines you need for painting purposes.
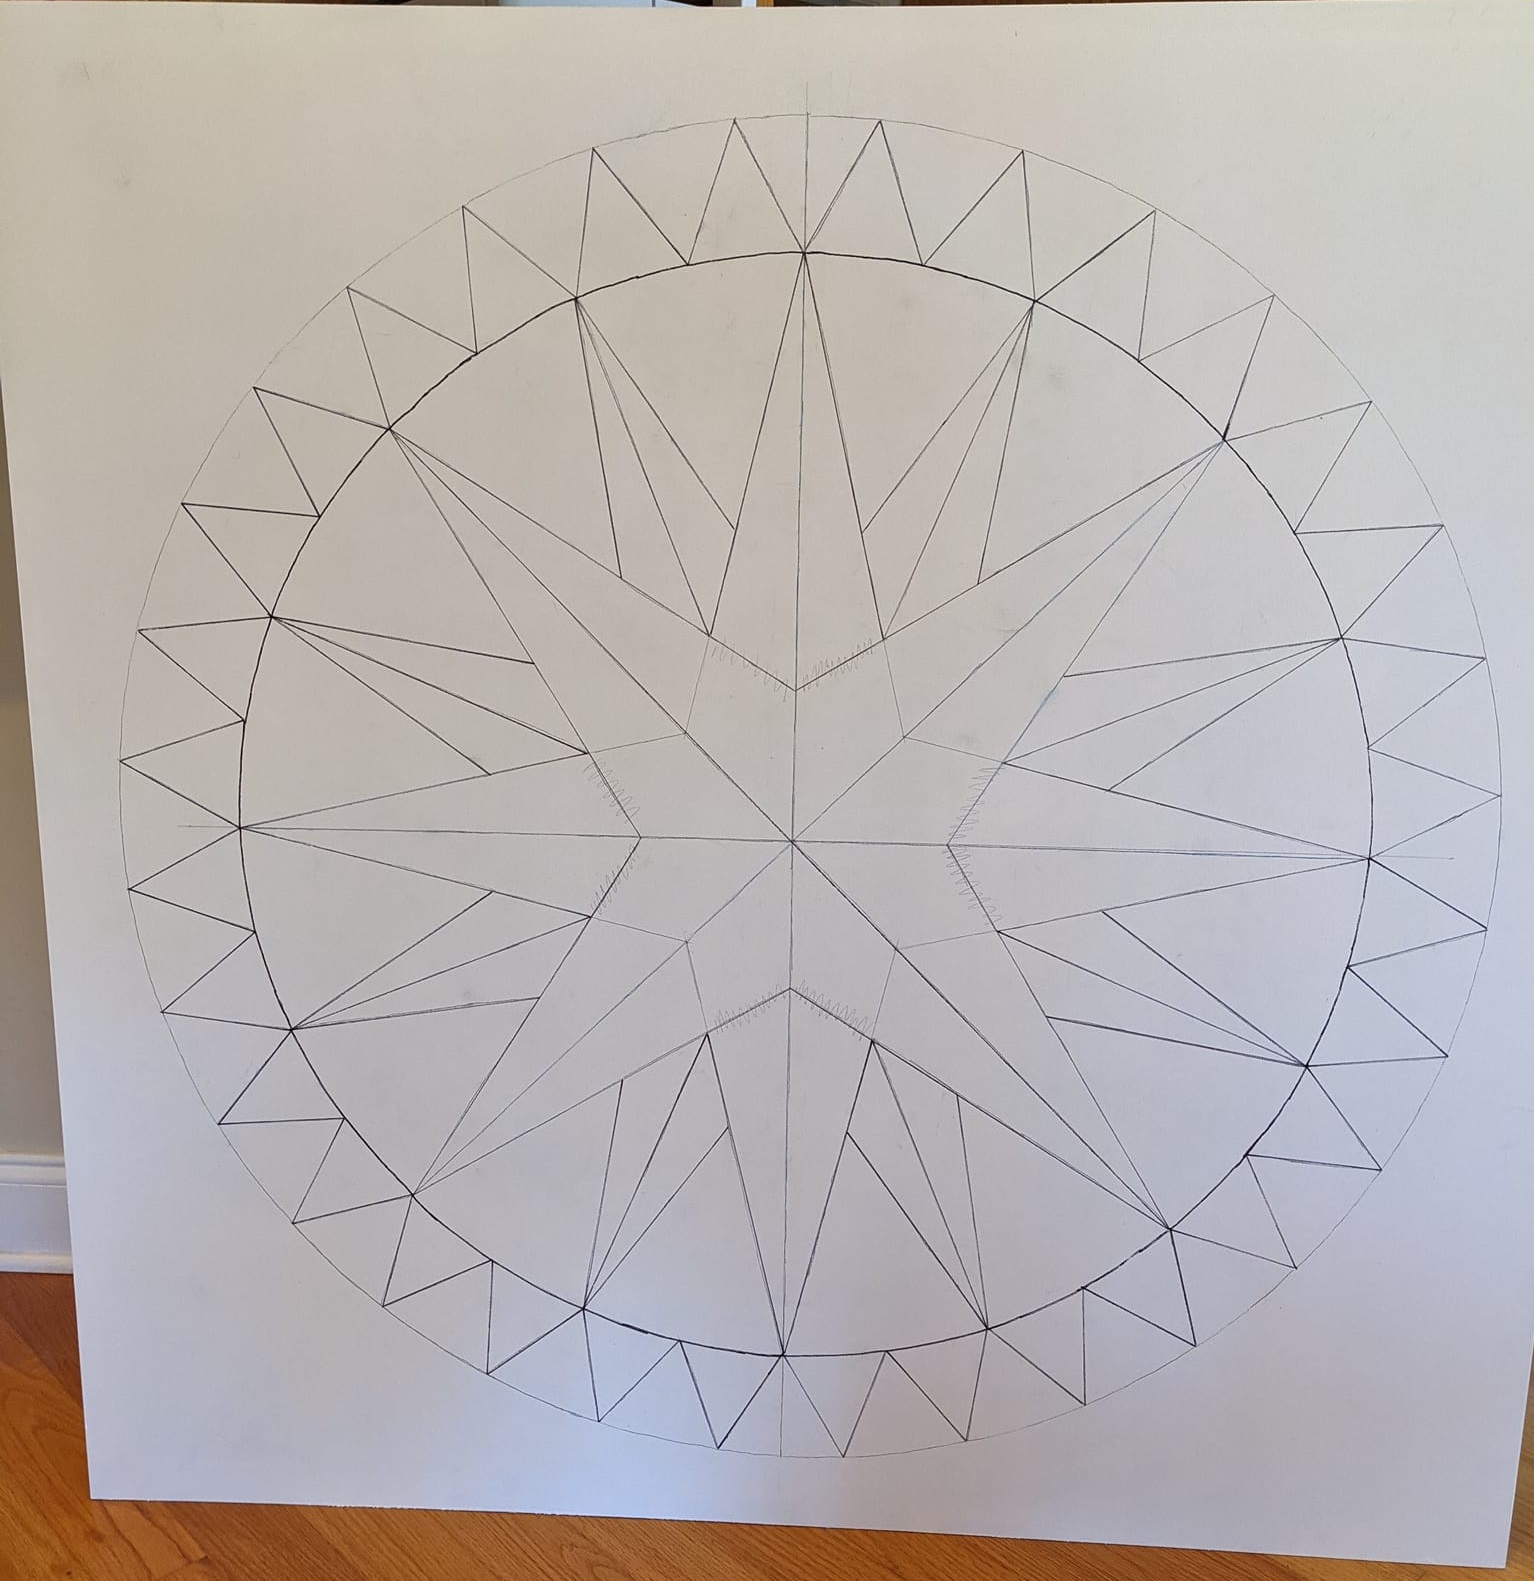
Traced the carbon marks with permanent marker. Then realized that the way I laid out the pattern would require the compass be mounted on point. I didn't want that, so I had to add lines to change the orientation of the star. Fortunately, this pattern was easy to modify.
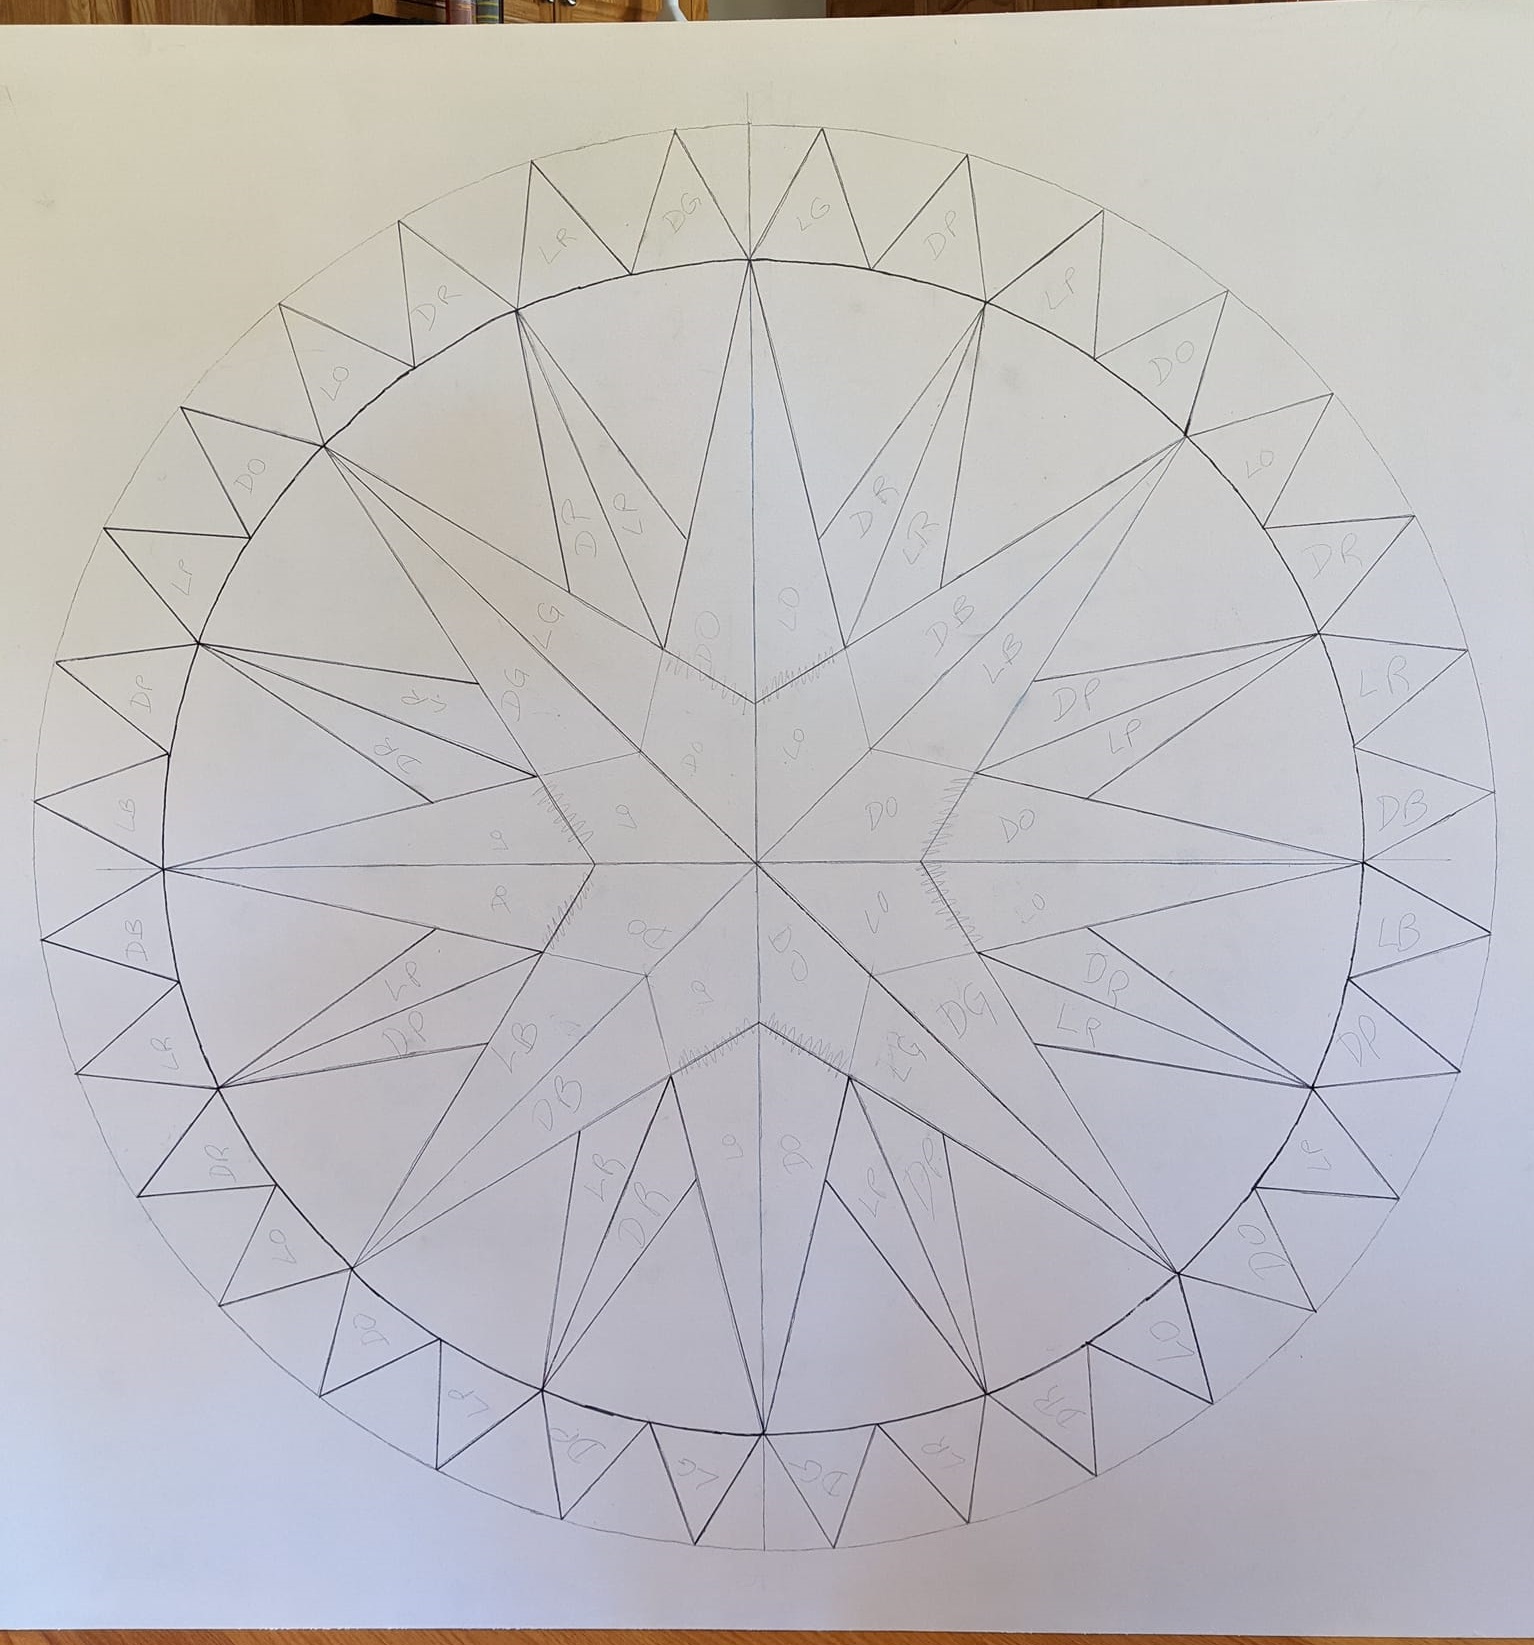
Labeled each section with color code.
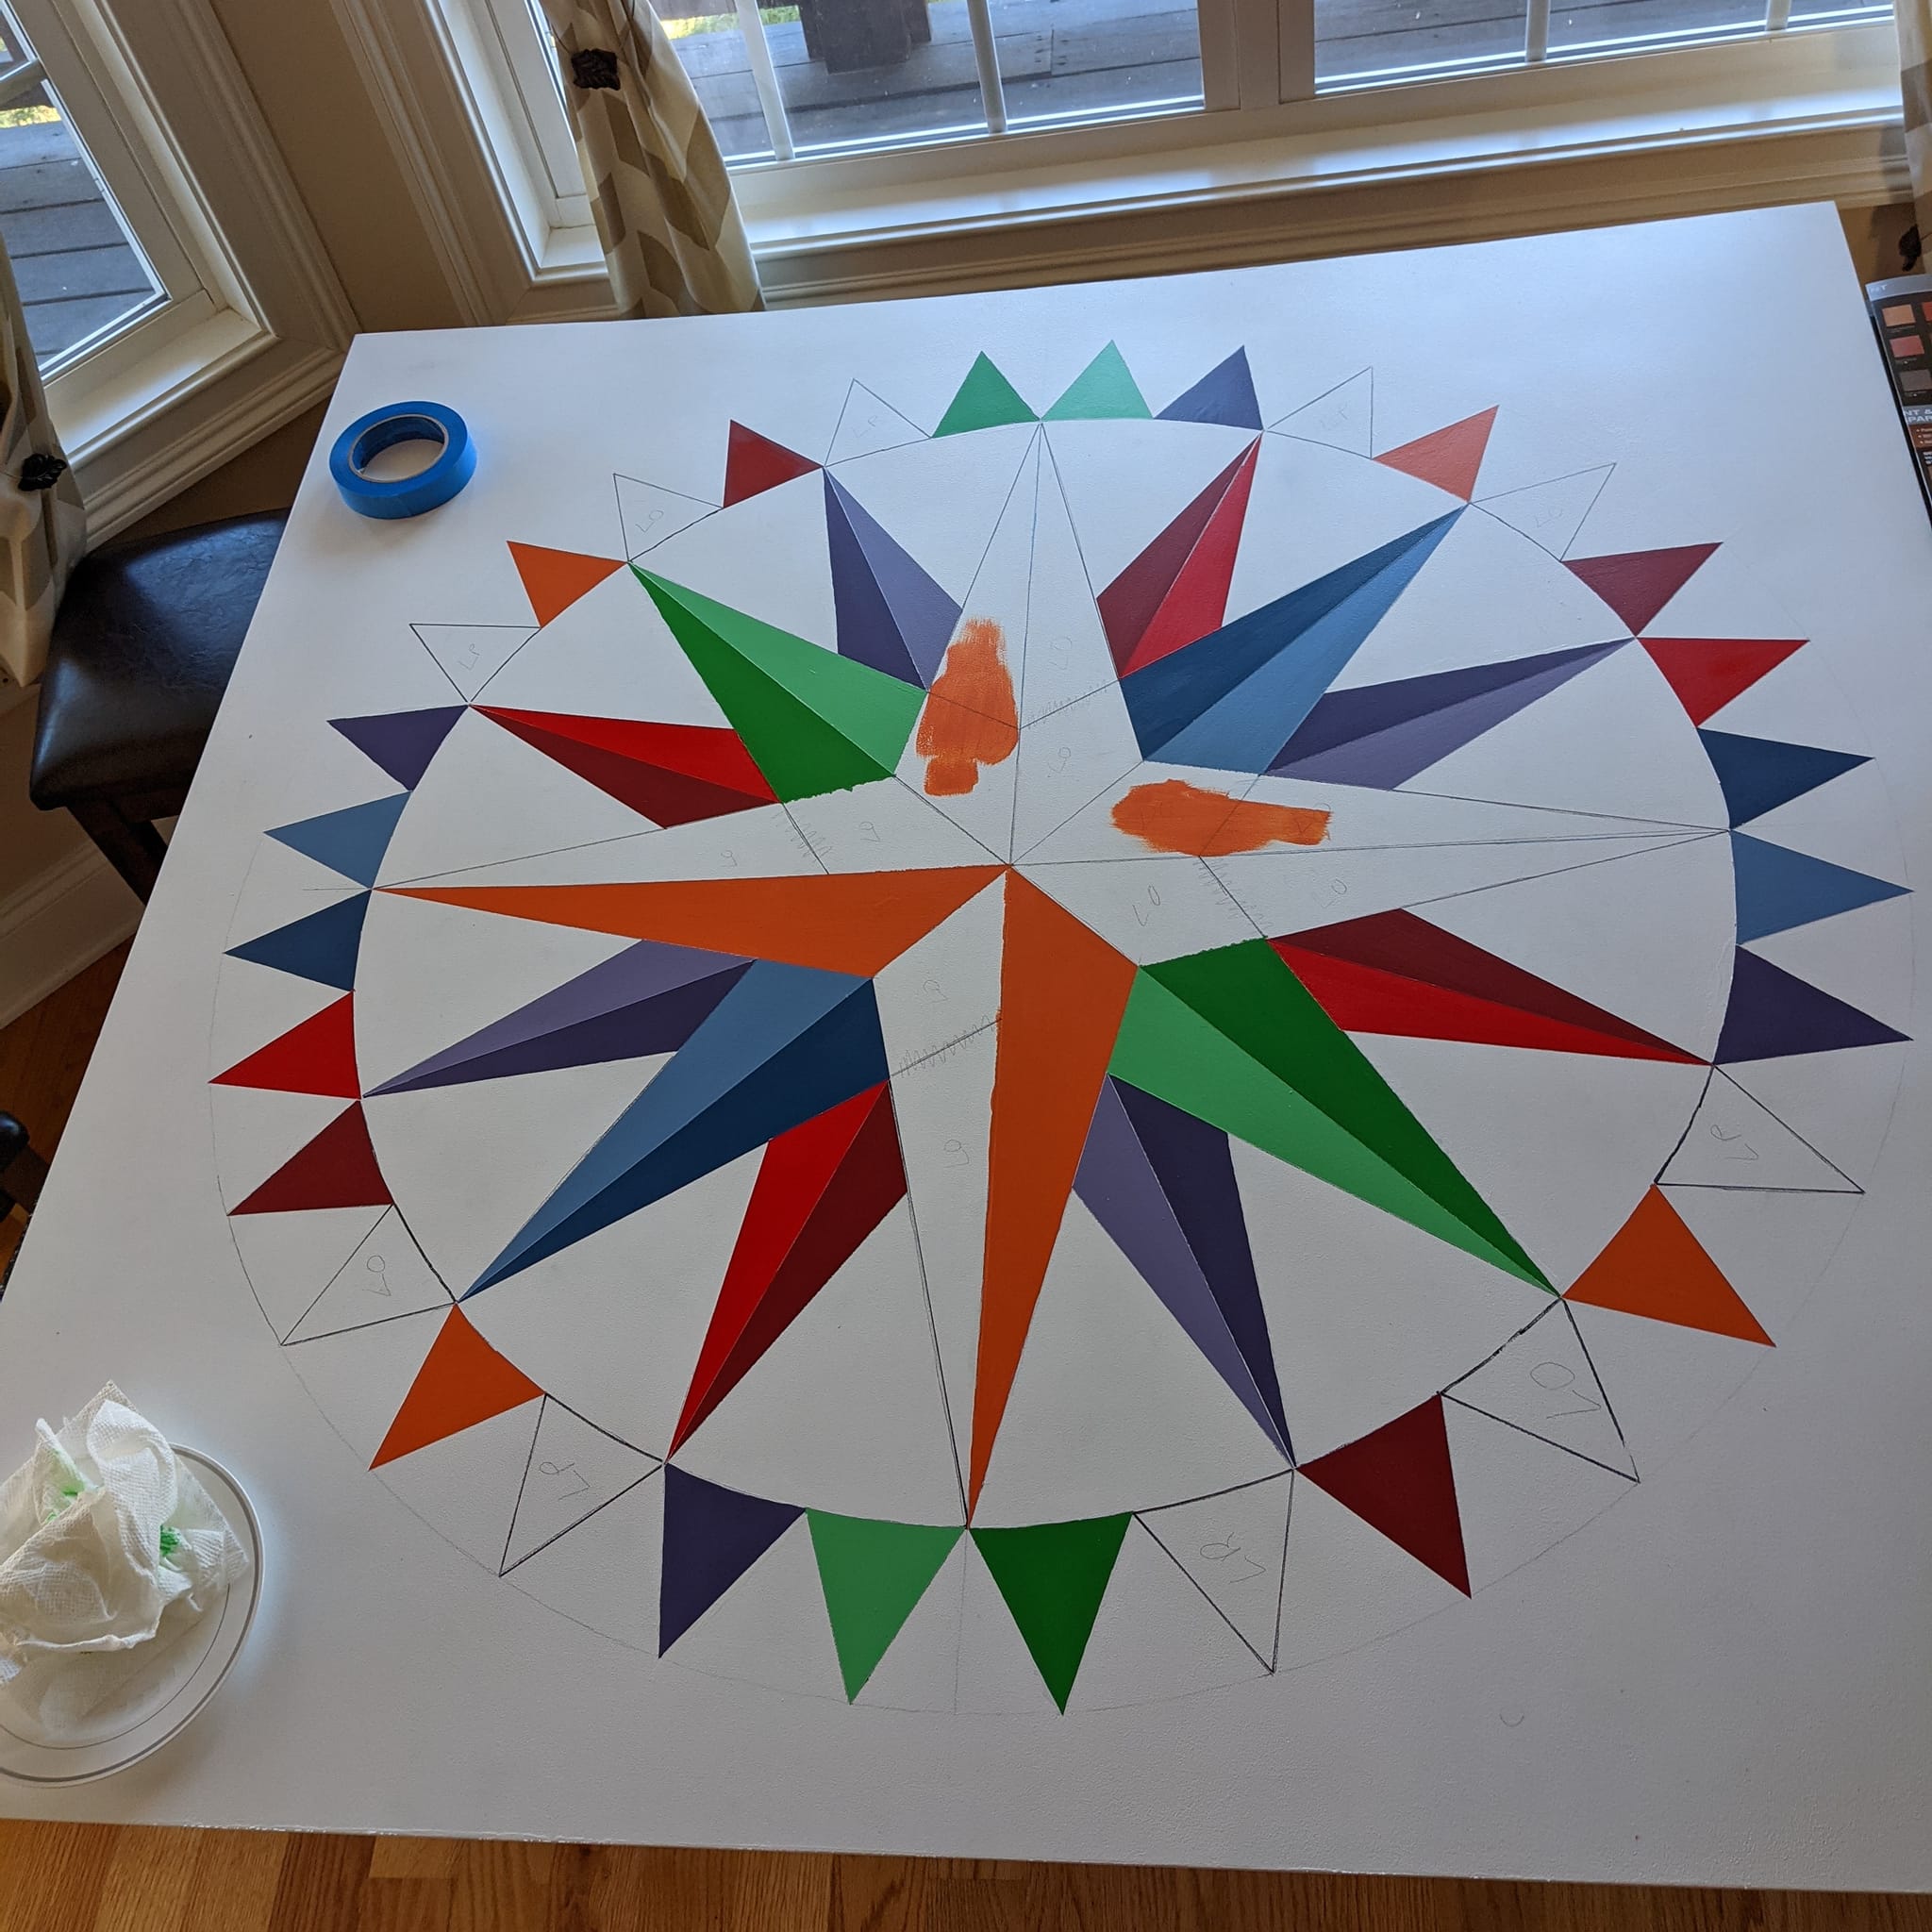
Painting each area... Used painters tape to outline each section. Then painted the edges that were bordering white with the white paint so that any bleeding would not be seen. (I forgot to do that on the first color and the purple paint bled under the tape. It took a steady hand and several layers of white paint to cover the bleeding.) I purchased exterior paint samples to paint the compass... Picking the colors was the hardest part... And listening to the paint guy grumble a bit about having to make 10 of them wasn't fun... But, goodness, it's not like they were free and he was getting paid to do it - ah well -... Anyway, there's plenty of paint left over so you'll be seeing these colors on some of my future barn quilts (for my sewing shed).
Then I labeled each area for the color I was going to use. Checked and double checked to be sure that I was right. Then it was a simple matter of using the painters tape to outline each color. ... Tips & Tricks Notes - Since the board was a bit bumpy, I should have used the Frogger brand of tape because it does a much better job on rough surfaces but it really wasn't that bad. Another tip, to help stop the bleeding into the background areas "load" a narrow brush with the background color and paint along the edge where the background borders the piece you will be painting. This seals the gap between the tape and the surface & that will stop the new color paint from bleeding under the tape and into the adjacent area. Again, I forgot to do this a few times so I did a lot of touch-ups after I finished with all the colors. ... Anyway, I tried to outline as many of the same color areas with the painters tape as I could so that I could be as efficient as possible. I also taped and painted areas in the morning and then again in the evening. This allowed plenty of time for the paint to dry and harden in between taping/painting sessions. So, needless to say, this took me about a week to paint. I will also tell you that I sprayed 2 or 3 layers of clear coat over the completed barn quilt. I tried to use a roll on clear (won't yellow) urethane but it bubbled and the paint brush left brush strokes. So, I used the spray type and it worked perfectly. Here again, I deviated from many of the other people who make barn quilts. Many don't put a polyurethane coating on theirs, but I did. I don't know if it was completely necessary, but I felt better about it. Only time will tell if it makes a real difference.
Then it was a matter of hanging it up. Fortunately, the contractors were still here finishing up the painting of my Sew Haven (she-shed) so they were able to hang it for me. I will tell you that they went inside the attic area and ran long screws into the studs to hang it. They also scabbed a couple of boards between the studs to be able to mount the barn quilt where I wanted it (it had to be centered or it would have driven me nuts). That baby isn't going anywhere. Then my sweet, wonderful, patient, husband painted the bolt heads so they would blend into the background.
So what do you think? Are you ready to make one? Jump on in! Feel free to reach out to me if you have any questions.

All done... Spent a day touching it up... I'm very picky... You can still see (faintly) the outer ring after at least 3 coats of paint. I finally gave up... I finally accepted the fact that you won't be able to see it once it's mounted on the house.

I used a frame made of 1x3 lumber square with a vertical center piece. Extra pieces of 1x3 we're used at each joint as a bracket. This allows the "quilt" to be raised up off the wall a little bit so rain and such won't accumulate as much on the top of it. Anyway, the frame was primed and painted with 2 coats of exterior white paint, too. Then I used 3/4" sheet metal screws every 6" around the sides to mount it to the frame. Then the guys used long screws to attach it to the house. (They also had to scab in a couple of boards between the wall studs for the barn quilt to be mounted where I wanted it.)
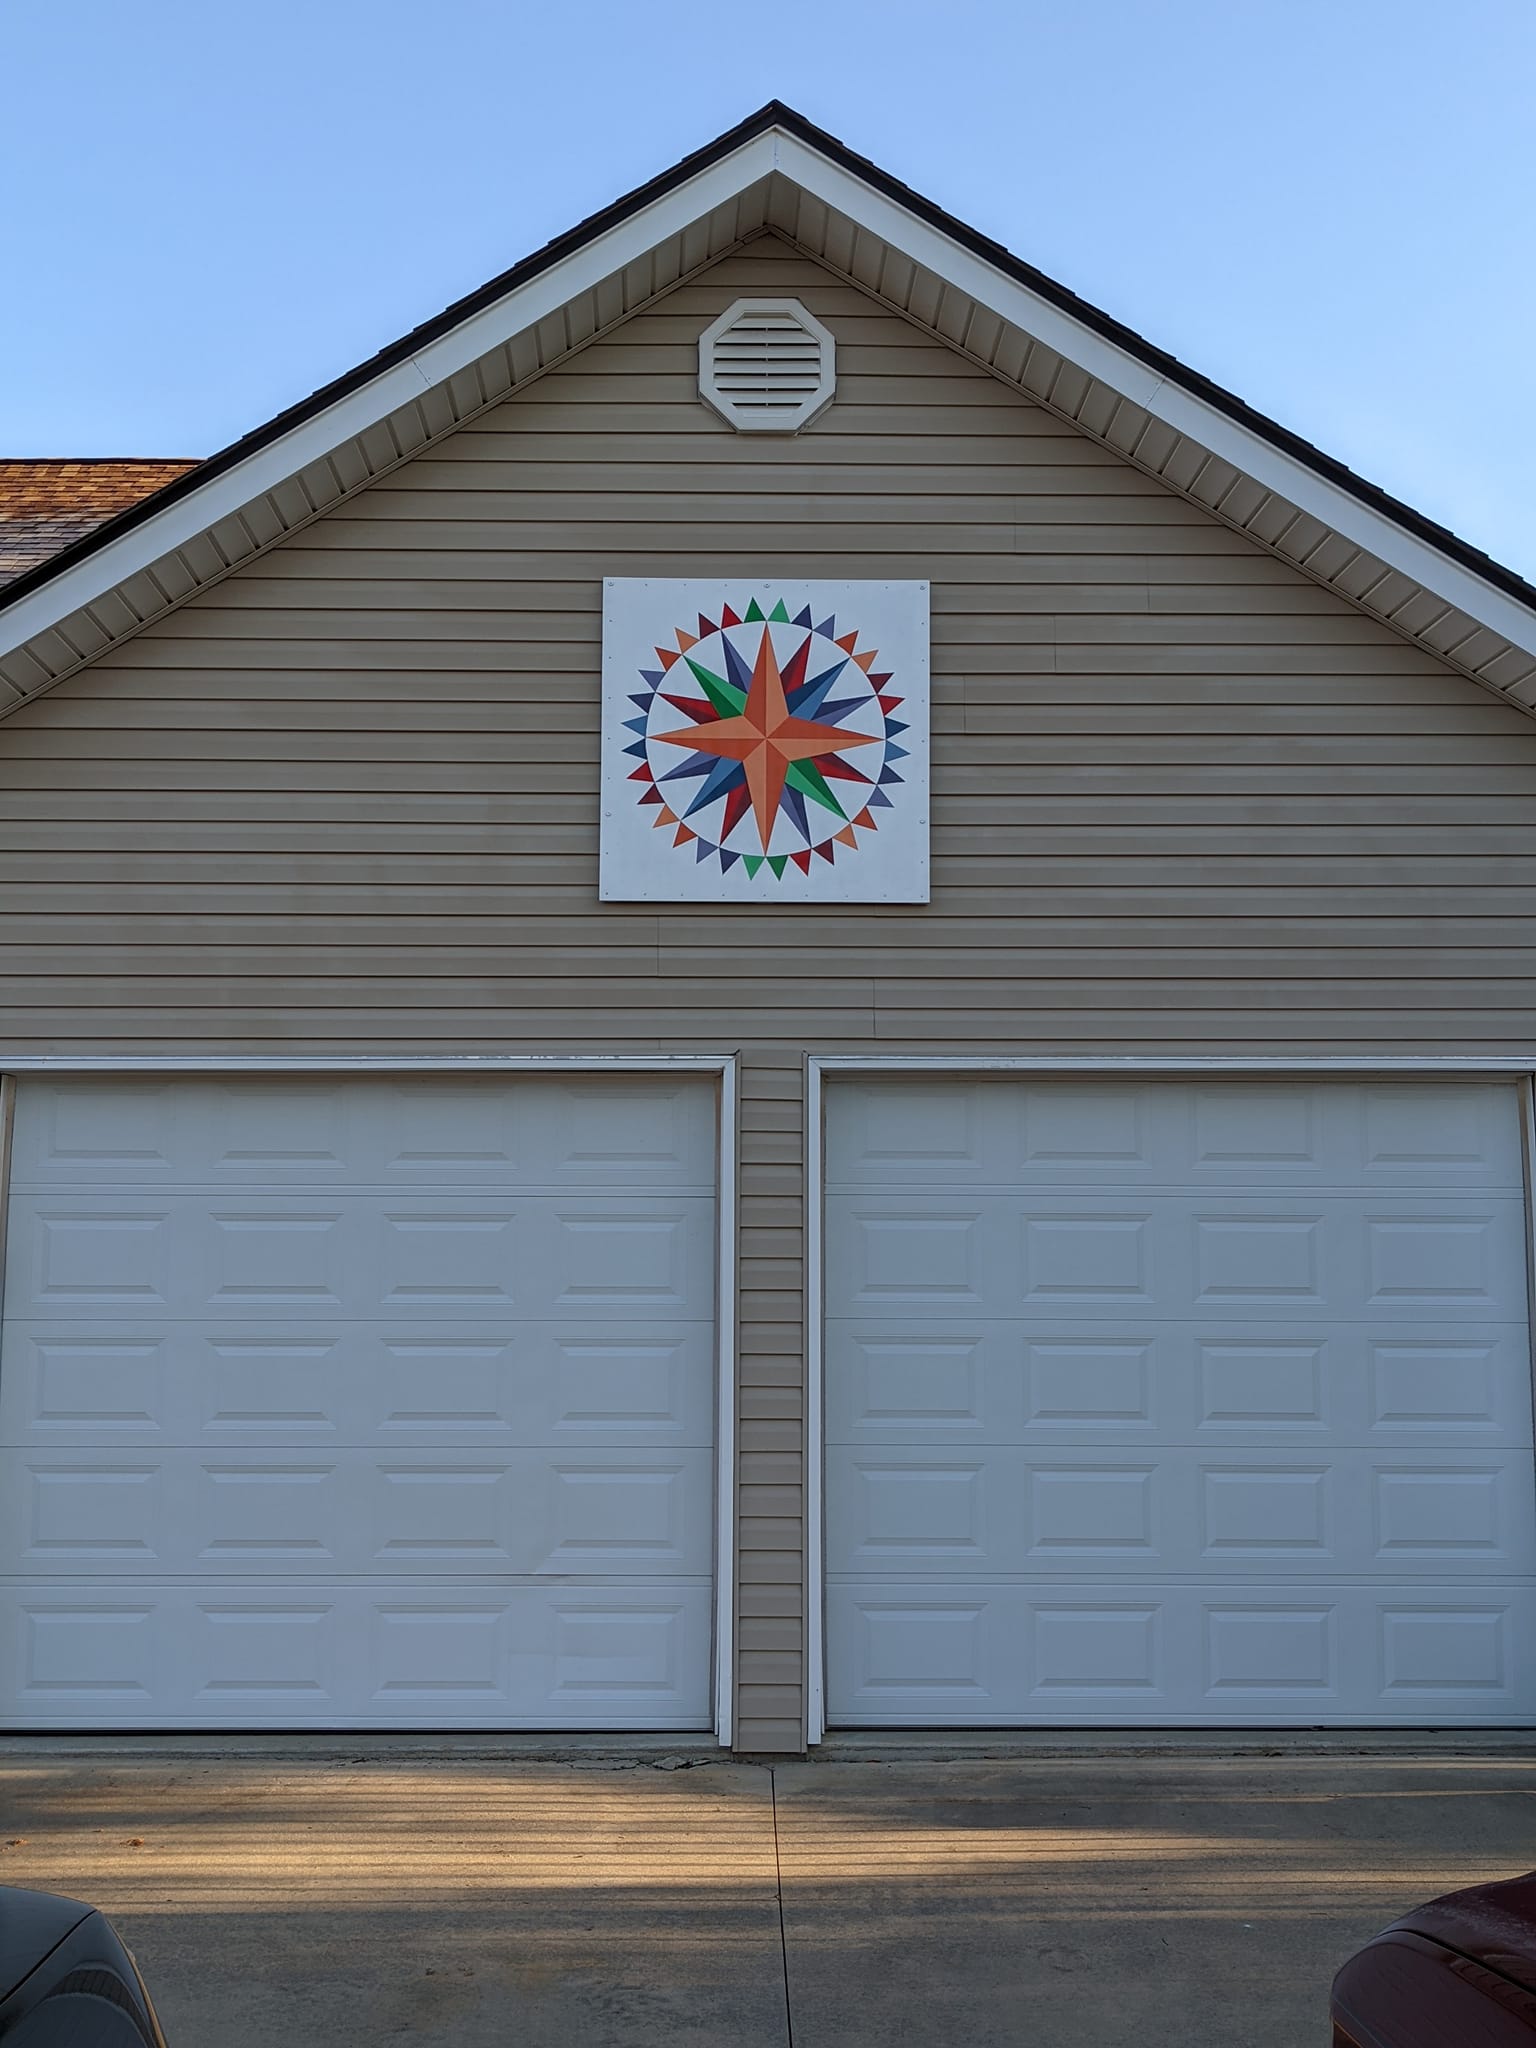
The finished quilt hung up. It adds a pop of color to a very large area of beige above the doors. It looks so much better now!
Comments