
Ice Dye Flowers

Ice dyeing flowers has become a real obsession with me. They never come out the same. There's always something to tweak, modify, or try, to see how it will change the look of the flowers. So grab your gear and let's make some flowers.
What you will need: Please remember that any items you use to dye fabric should never be used for food prep again. So use disposable items or old items that you don't need in the kitchen anymore.
- cotton fabric (at least 60% cotton) - you can use this method to dye other fabrics but cotton is a good fabric to use when first learning how to do this. The pictures I'm sharing are of 100% cotton dishtowels that I purchased from Amazon. They are a bit thicker and are stiffer than napkins or quilting cotton. I would suggest using the thinner cotton items for your first try. Cotton napkins or flour sack towels are great to work with & you'll have really pretty one-of-a-kind linens to show your next guests.
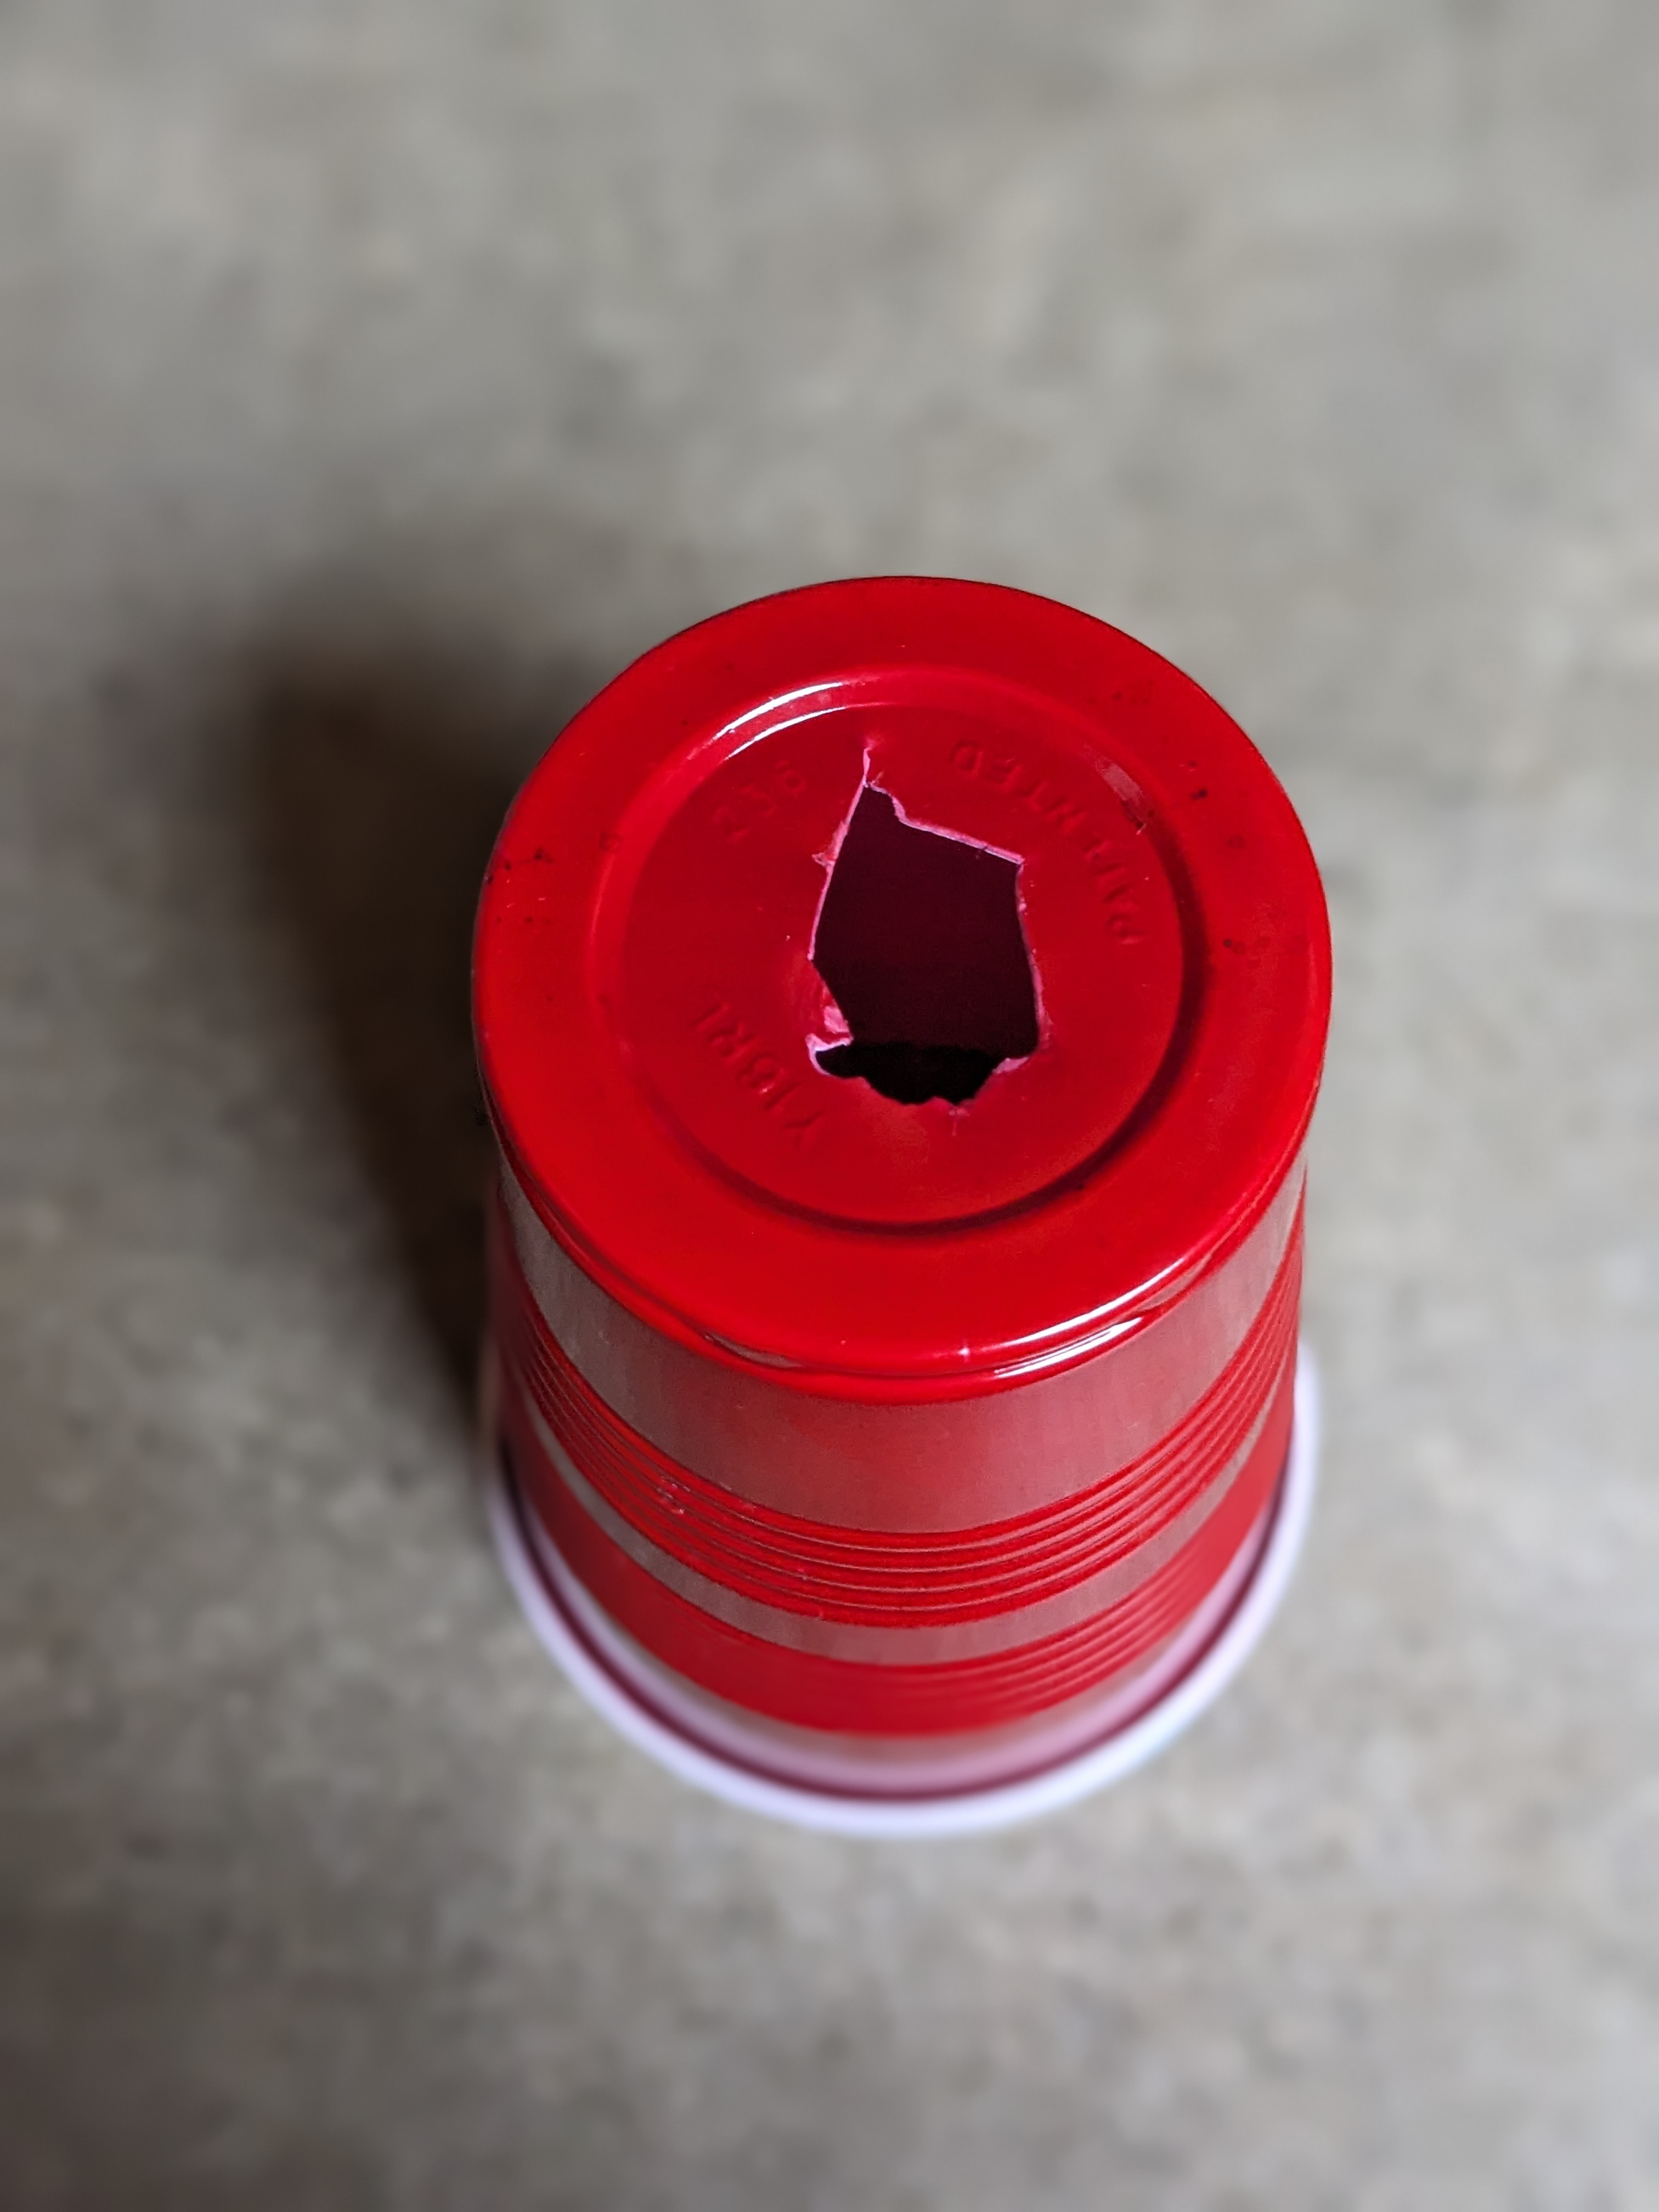
- cups/small bowls with holes in the bottom (about 1/2" - 3/4" diameter)
- To make larger flowers - use 16 oz Solo cups or similar size/style containers
- To make smaller flowers - use12oz clear cups, small styrofoam food take-out bowls, yogurt cups, or similar size/style containers
- spoons for the dye - at least one that's very small for getting dye into the little hole (or you can use a straw with the end cut at an angle for getting the dye into the center of the hole)
- a rack to put the fabric on - plastic or plastic coated metal (if there is any exposed metal or rust apparent on the rack - cover it with plastic wrap "saran wrap", and then slice through the plastic through the openings in the rack. This will cover the rust spots and help prevent rust from marking your fabric.)
- ice barrier - cardboard, folded aluminum foil, or silicone cake molds - whatever is handy that you can use to create a barrier around the item to hold the ice. You will need something to hold the ice barrier's shape and position. If you use cardboard or foil, you can use tape to hold it together once you've shaped and positioned it. You can also use rocks, bottles, clothespins, etcetera to hold the barrier in place.
- a tub/tote/bin that is large enough to hold the rack. The tub will catch & hold the melted ice (referred to as "muck") so make sure it doesn't have any holes in it.
- Procion dye powders in the colors you would like for your flowers and background. You don't need to go wild and spend a bunch of money, especially if you are new to dyeing fabric. You can get small kits from many of the hobby stores.
- Soda Ash - Soda Ash is used to increase the PH level of the water. This is what activates the dye and makes it "stick" to the fabric.
- PH neutral soap - like Synthrapol, textile detergent, original blue Dawn dish detergent, etc.
- Ice - You'll need "small" ice. This is regular ice from your freezer or store bought bagged ice. You'll also need a few pieces of "big" ice. I use individual yogurt containers and 12 oz party cups to make the "big" ice. I just fill them with water and freeze them. Once they are frozen, I remove the ice from the containers, put in a bag, and make more ice. You'll need 2 pieces of "big" ice for each flower. You'll use the small ice around the edges and in the background areas.
- Gloves - rubber kitchen gloves, food prep gloves, medical gloves - anything that fits pretty well so that you can protect your skin from the soda ash and dyes. I prefer the kitchen gloves or the nitrile gloves.
- Mask - for occasional dyeing, the simple medical masks are fine. For more frequent work with powdered dyes, I suggest the N95 masks or respirators. Whichever type you use, make sure the mask is properly fitted to your face. Dyes consist of very fine powders that easily float everywhere. They are very lightweight and can easily be inhaled. Though procion dyes are not toxic, they still aren't something we should subject our lungs to.
- Eye protection - this is something that I don't always wear. I try to be very careful with the scouring and soda ash solutions. I rarely experience any splashing so I don't usually wear eye protection. I also work outside. There's usually a light breeze that blows across my work area (and therefore blows any chemicals away from me). But on those days that I'm feeling rushed or clumsy, I will put on my safety glasses. I will also tell you that I have gotten things splashed in my face and occasionally in my eye(s) and it does cause skin & eye irritations that can last a few days. I also know of people that have had to go to the ER to have their eyes thoroughly irrigated and treated. So it is a real risk. I won't tell you that you don't need to wear safety glasses. I will tell you that you should want to - but it is up to you to decide whether you wear them or not. Are you sensitive to chemicals? Do you have allergies? Limit your risk - wear safety glasses.
- A warm place (above 70 degrees) for the fabric to process for at least 24-48 hours. Preferably this needs to be in an area that is out of the way. You don't want to have to worry about tripping over it or dropping something on it.
1. Scour the fabric. Most fabric (dye blanks, clothes, etc.) have been treated with chemicals. These chemicals need to be removed from the fabric in order for the dye to be able to bond with the fibers. To scour the fabric you can:
- (In a top load washing machine) Fill the washing machine with hot water (110-120 degrees - you may need to add boiling water to get the temperature hot enough). Dissolve (for a full tub of water) 1 Cup of soda ash and 2 Teaspoons of synthrapol (Dawn dish soap or other PH neutral fabric detergent) in the hot water and then add the fabric. If you are using less water, please adjust the soda ash synthrapol accordingly. (Some fabric dyeing enthusiasts scour their fabric with 2 Cups of vinegar in lieu of the soda ash and detergent. I have not tried this so cannot say how well it works.) Ensure there is enough water to allow the fabric to move freely around in the water. Set the machine to its longest wash cycle - minimum of 30 minutes (an hour is even better). Let it go through the rinse cycle.
- (In a front load machine) I don't have a front load machine so I don't know exactly how much soda ash and synthrapol to use. But in the research I've done, it appears that you use about half (maybe less) of the amount that you use in a standard top load machine. The rest of the directions are the same as with the top load machines.
- (Stove top - in a pot) (or stockpot on a propane burner) In a large stockpot (preferably stainless steel or enamel coated) fill with water (about 2/3 full - remember you'll need room for the fabric) and add about 2 Tablespoons of soda ash and a few drops of synthrapol per gallon of water. Bring the water to a gentle boil and add the fabric. Continue the gentle boil with the fabric for about 1 hour. Stir it frequently to ensure the fabric does not "ball up".
- If you are scouring an older fabric - shirt, jacket, towel, napkin, etc., you should scour the material on the stove top. Those fabrics have probably been washed at least a few times and will have a build up of oils, softeners, and other chemicals. Scouring these items can take 2 hours or longer. While boiling these items, look to see if the water is discoloring - turning beige or brown. If it does, let the fabric boil for at least 2 hours. If the water is very dark, pour out the water, rinse the fabric, and repeat the scouring process again.
- After you have scoured the fabric, rinse it in plain water. Then let the fabric dry. If you use a dryer, don't use a dryer sheet.
2. Make the soda ash solution for soaking your fabric. Mix 1 Cup soda ash in 1 gallon of warm-hot water. The water needs to be warm enough to dissolve the soda ash. The fabric needs to be able to move pretty freely in the soda ash solution. So you may need to make a 2nd gallon of soda ash. This soda ash solution can be kept for quite a while. So if you are plannning to do more ice-dyeing, put the soda ash solution in a container that you can seal up so it won't spill. I keep mine in a 5 gallon bucket. I will keep mine for up to about 4 months. I just add more as I need to. It can go bad though. So if you open it up and it has a strange smell, dump it and start over with fresh solution.
3. Soak your fabric for 20 - 30 minutes. If the fabric is bunched up, stir it several times during the soaking process. This step is important. The soda ash solution is required for the dye to bond to the fabric. If the fabric isn't thoroughly soaked, the dye will not adhere and you will not get as vibrant and colorful an outcome as you will probably want.
4. Put on your gloves. You will want to wear gloves for all the next steps. Soda ash will make your skin feel slick and will dry it out and the dye will change your skin color for a few days. So be kind to your hands & nails and put on those gloves.
5. Remove the fabric from the soda ash solution. Squeeze it out. Continue to wring it out until it is very damp but not dripping. You can also put it in the washing machine and spin it for a few minutes - again, very damp but not dripping. If your washing machine adds water during the spin cycle, make sure you turn off the water spigot before you start the spin cycle. You don't want the soda ash solution on the fabric to be diluted with water.
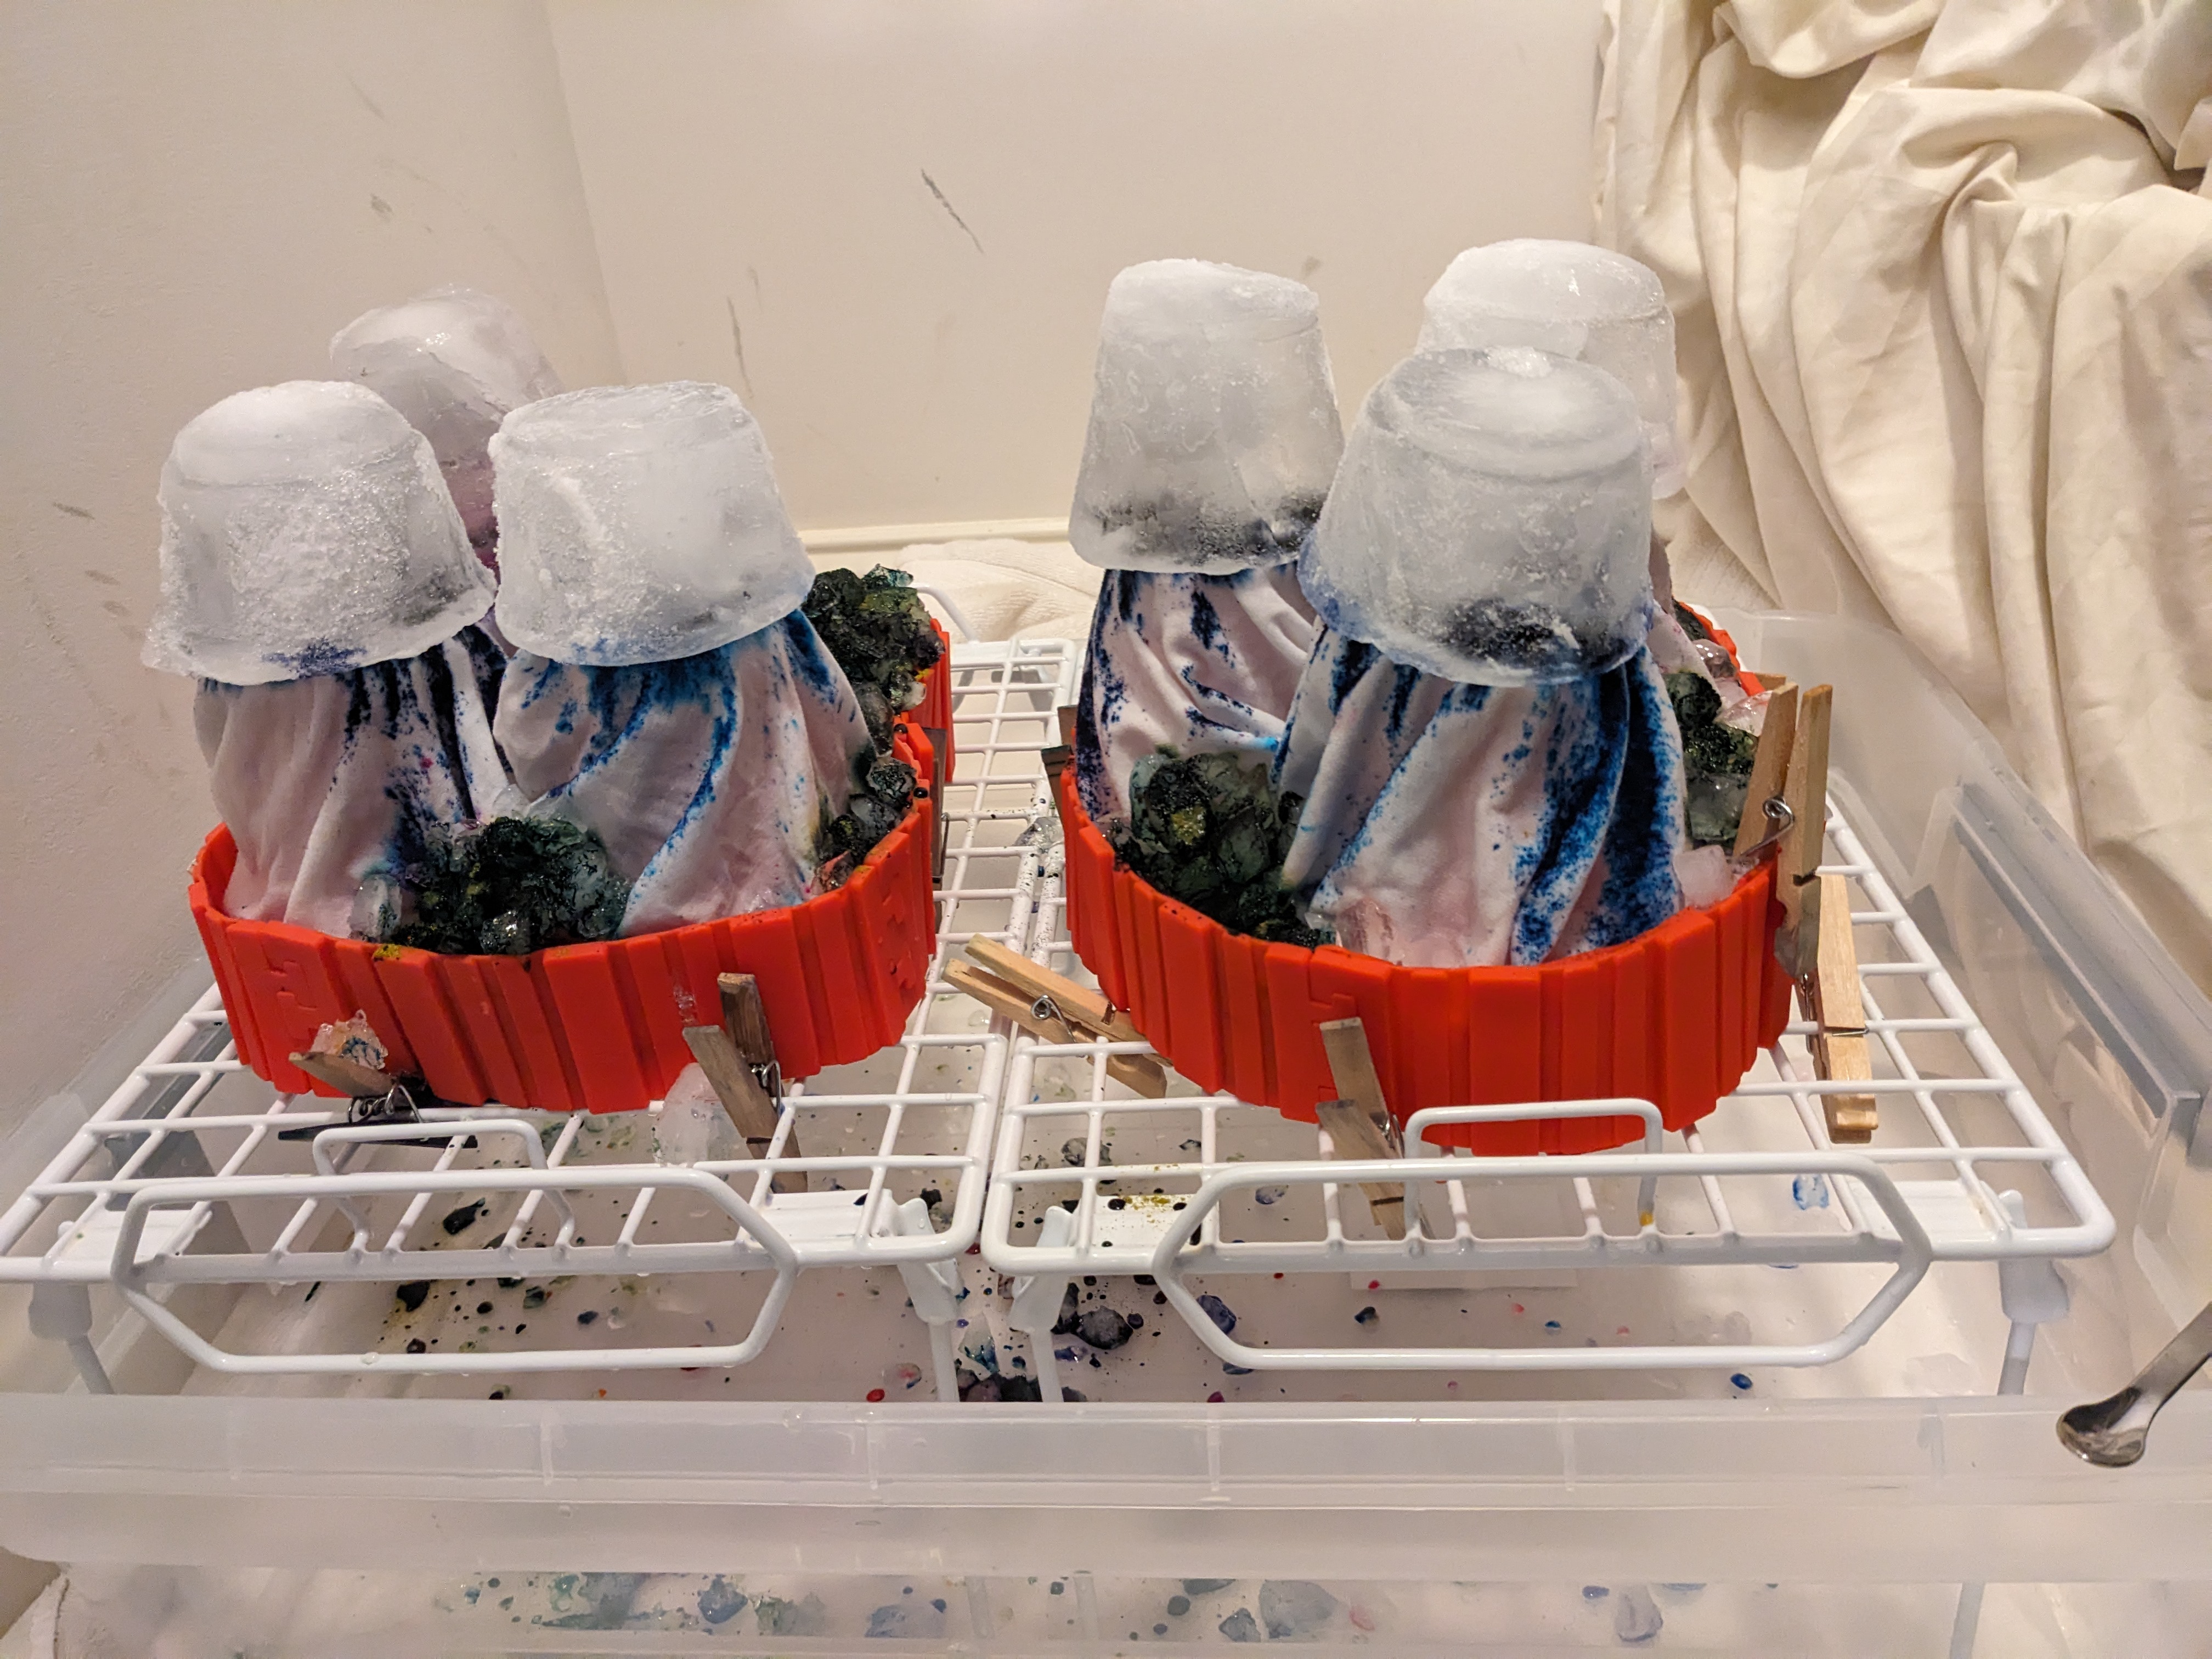
6. Prep the fabric dye area. This can be done while the fabric is soaking in the soda ash. (In the area where you are planning to "process" your creation...) Place the rack(s) in the tub/tote. If the racks have legs on them, extend the legs. If the rack(s) don't have legs, you can put yogurt containers or the short 12 oz cups upside down on the bottom of the tote/tub and put the rack on top of the containers/cups. Set out all the rest of the supplies: cups/containers with holes in the bottom, spoons, dye, bucket/cooler with the "small" and "big" ice, and the ice barriers with holding devices.
7. Creating the flowers. This is a bit of trial & error until you get the hang of it. Lay out the fabric and decide (roughly) where you want the flowers. You can mark the centers with a dot of color from a washable marker. This often changes as you work with the fabric. Sometimes you'll find that you need more room between the flowers, sometimes you'll just decide that you want fewer (or more) flowers than you planned on. Sometimes you just change your mind because you want to. Remember, this is not an exact science. Ice-dyeing is fun and you will never get the same results twice.
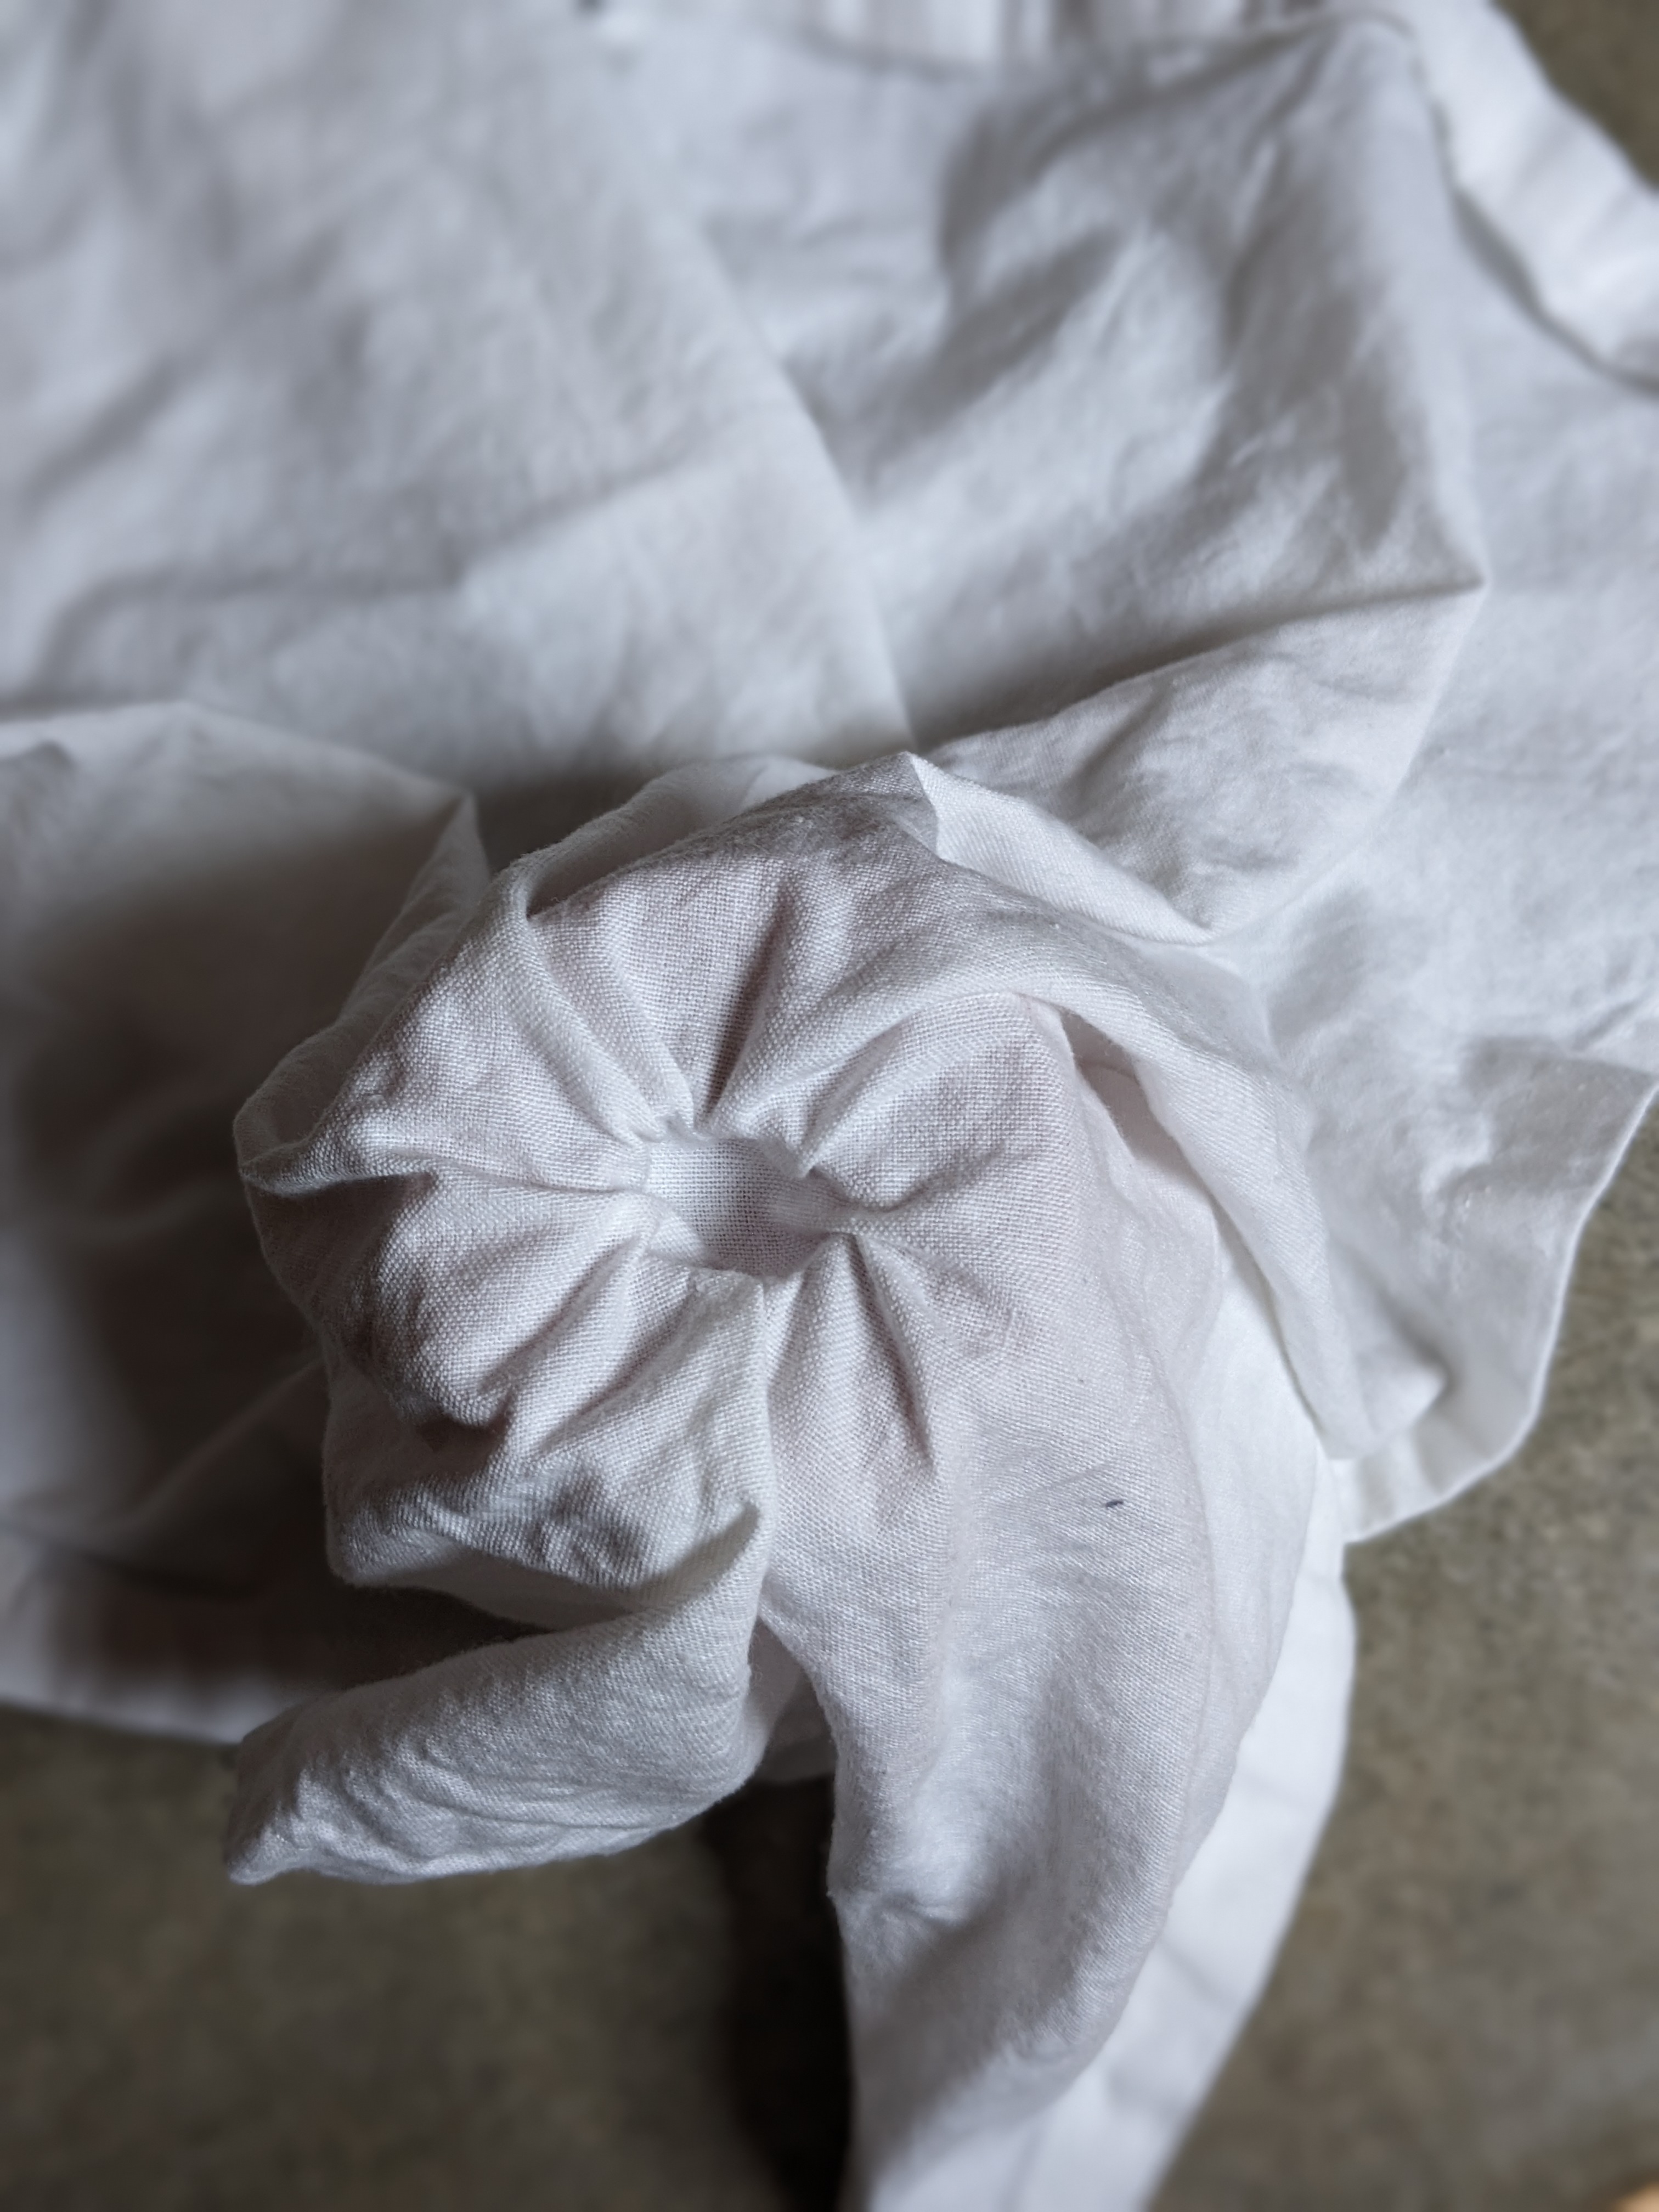
Back to the flowers. Place the cups/containers with the holes upside down on the rack. Hold the fabric wrong side up and gently drape it over the cups. If you are dyeing a shirt, you will need to turn it inside out. Move the fabric around so that it touches the rack between the cups. Then look at the layout. Is it roughly what you want? Are the flowers about the right distance apart and in the right area of the fabric? Again, this is just a rough idea of what you're going to end up with.
Once you've settled on the rough layout, you'll begin to shape the flowers. Start with the first flower that is closest to an outside edge. Gently poke your finger in the hole, push the fabric into the hole and hold it there. Gently twist the cup and fabric - about 1/4 turn. Repeat the process with each flower. Again, make sure the fabric touches the rack between the cups. If the fabric does not touch the rack, the petals in those areas will be shorter than the areas where the fabric does touch the rack. The fabric twists will interact with twists on other flowers. This is absolutely fine. Where the twists intersect, the flowers will appear to be touching. This process can be a little frustrating if the fabric is a little thicker (like the tea towels in the picture). I would get 2 of the flowers settled and while twisting the 3rd one, I'd pull out the twists of the first 2. Just accept that you will be tweaking it a few times before you get them all done. AND THIS IS FINE, NORMAL, GOOD. Don't get aggravated, just laugh and keep going - just be gentle and it will all work out.
When you have all the flowers twisted and ready, bunch up the rest of the fabric around the sides (or middle - if you have planned background area to be in an inner area). You can just scrunch it up by pushing the fabric in towards the cups. Or you can push it in towards the cups and then gently pinch areas of the fabric and pull them up a bit higher than the scrunched area around it. The more depth to the scrunches, the more "movement" you will get from the dye.
8. Placing the ice barrier. Using the cardboard or other barrier devices, carefully surround the fabric. The barrier should touch or almost touch the edges of the fabric. Brace the barrier with clothespins, tape, rocks, whatever you have, that will keep the barrier in place for the next day or two.
9. Placing the dye. Remember, a little dye goes a long way. But not enough dye will leave you with pale colors and/or white areas. It takes a little while to work out how much is enough. Generally speaking, I used a total of 1/4-1/2 teaspoon of dye for each of the flowers in the picture.
The flowers are done DUI (Dye Under Ice) and will be done first. First, carefully place a small amount of the dye color you want for the center of the flower in the hole. Then (only) on the flat area around the hole, sprinkle the dye color(s) for the petals of the flowers. Continue to do this for each of the flowers. Don't sprinkle dye on the sides. The melting ice will carry the dye down the sides and all the way to where the fabric touches the rack.
Then the rest of the area is done DOI (Dye over ice). Carefully place a layer of "small" ice over the bunched/scrunched fabric (about 2 inches thick). Then you will carefully sprinkle the background colors over those areas.
Now you can place the "big" ice pieces on the tops of the flowers. I do this last because the big pieces of ice can shift or get bumped while I'm spreading the ice and dye over the background areas.
The ice has begun to melt and the dye is starting to flow down the sides.
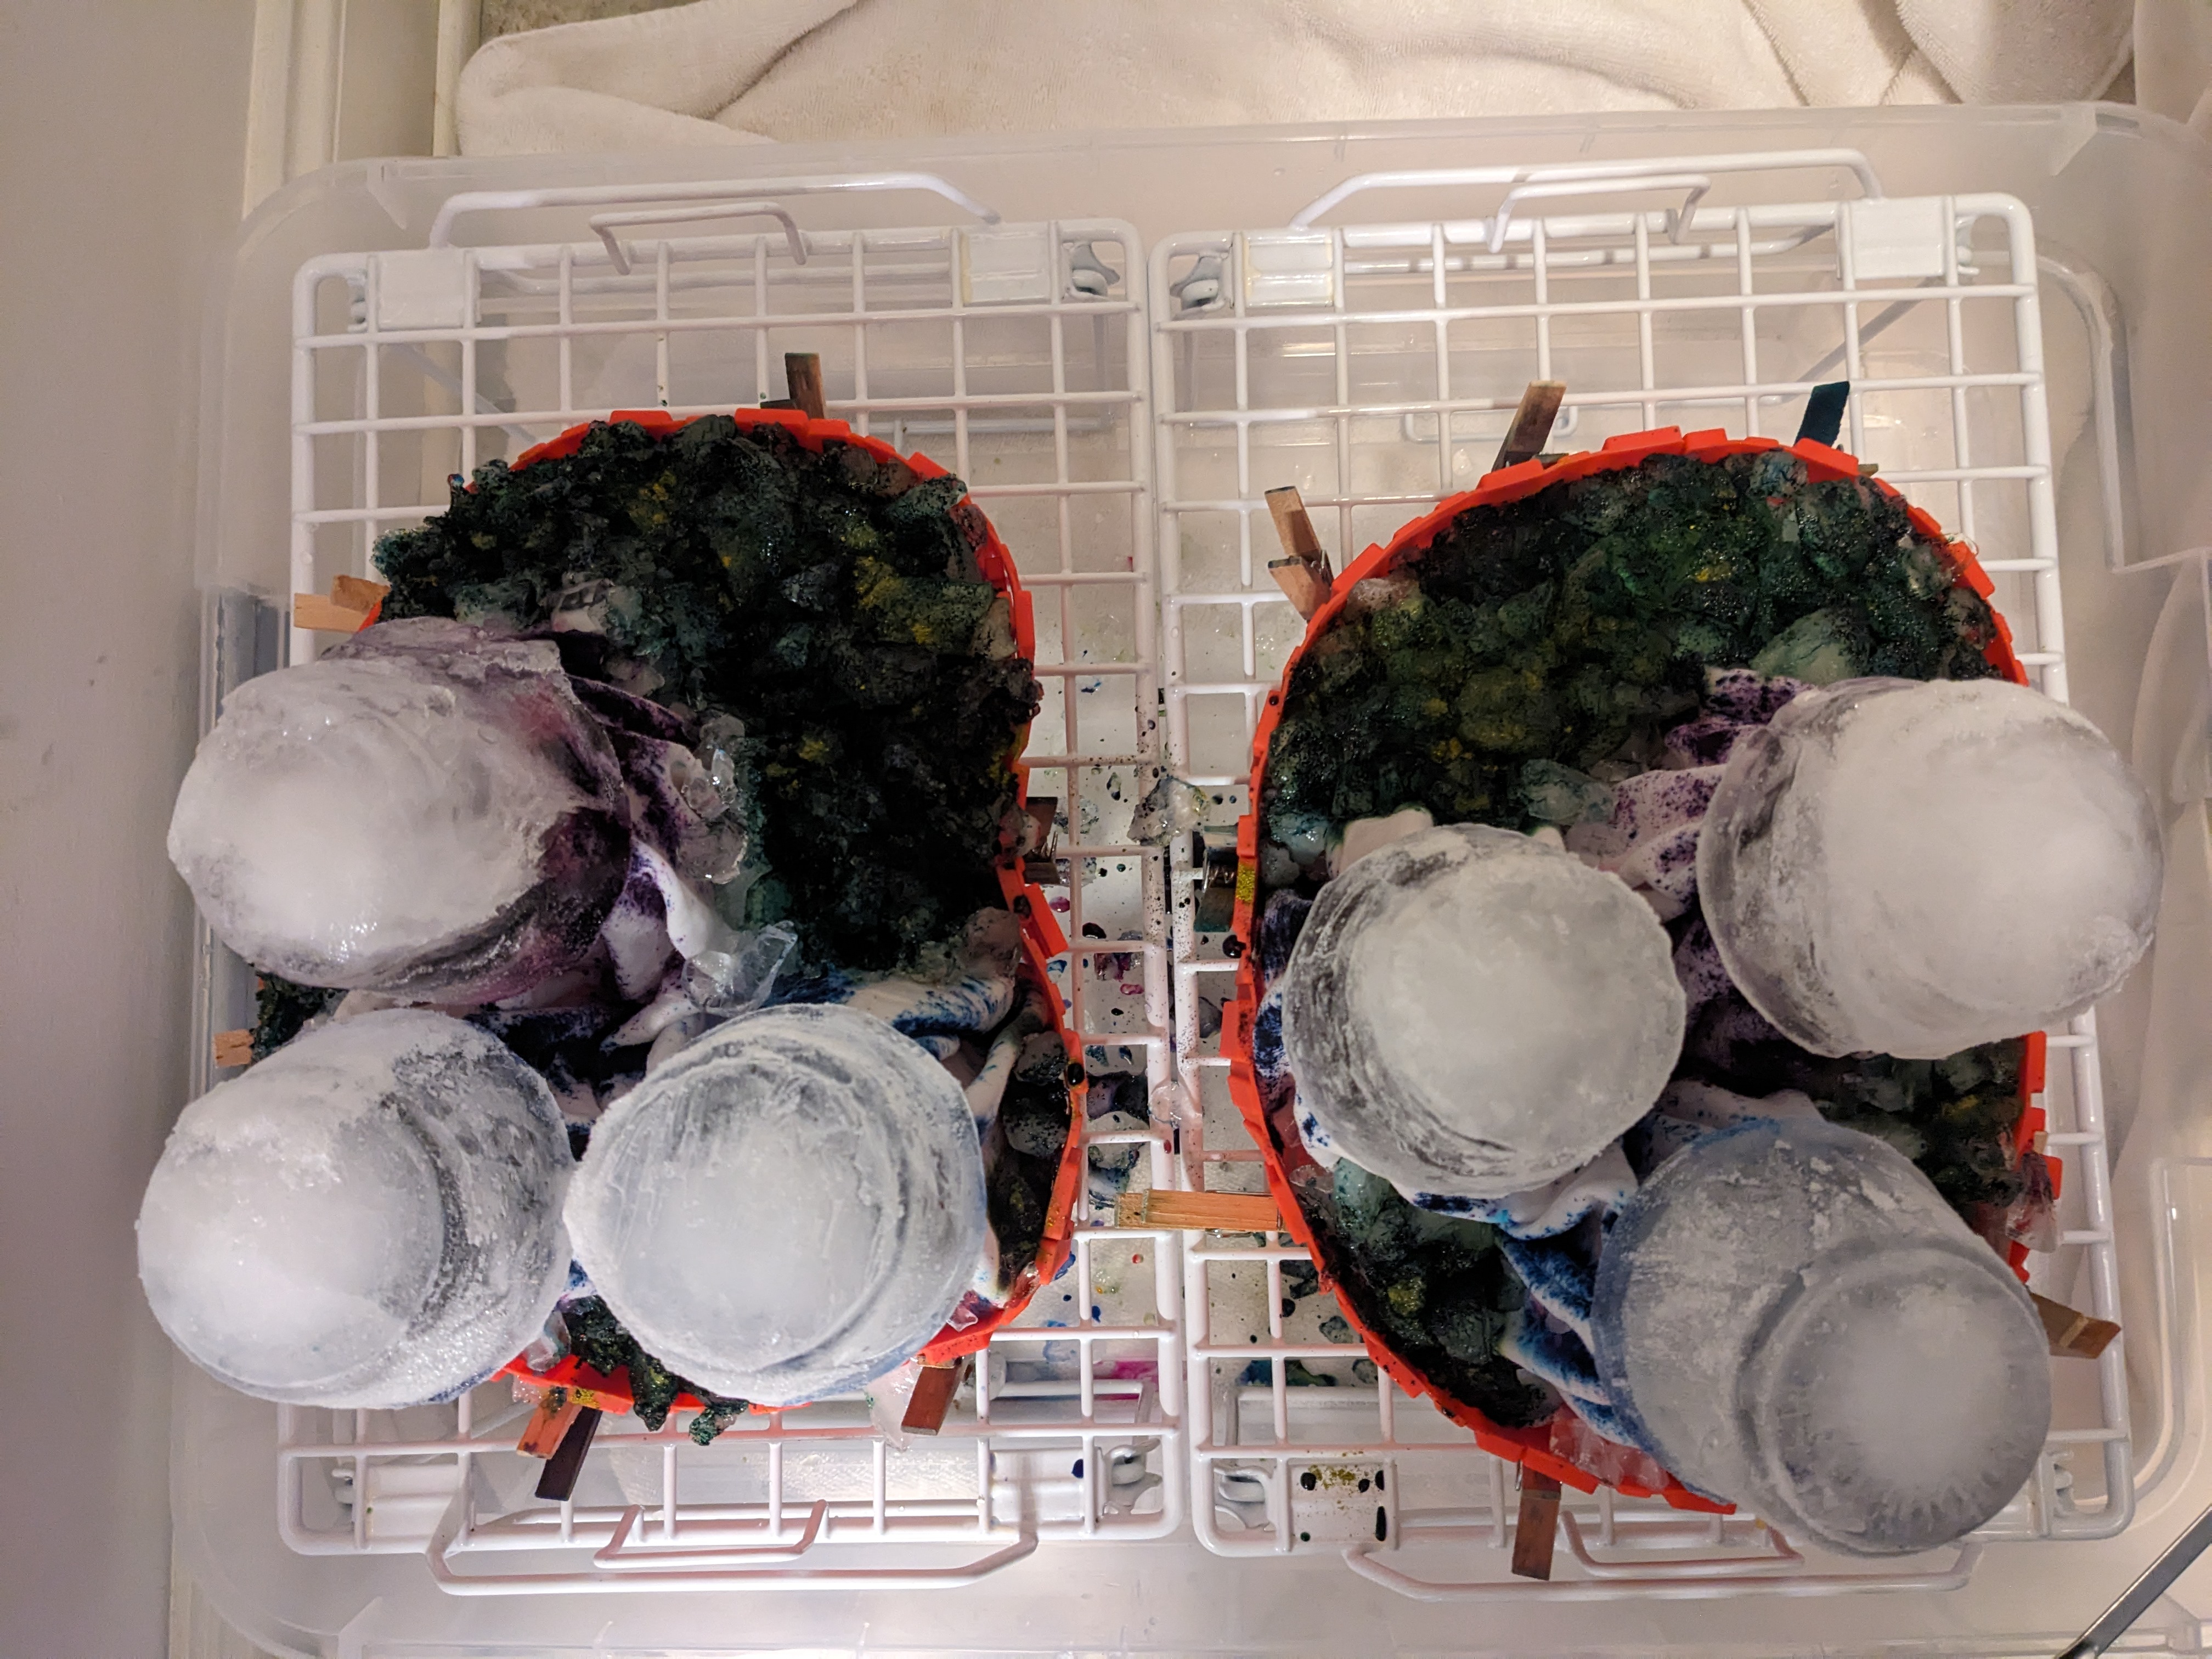
A view looking down on the setup. You can see the background areas around the sides & above the flowers.
The 2nd batch of ice is partially melted. You can see how much and how far the dye has flowed down the sides of the flowers.
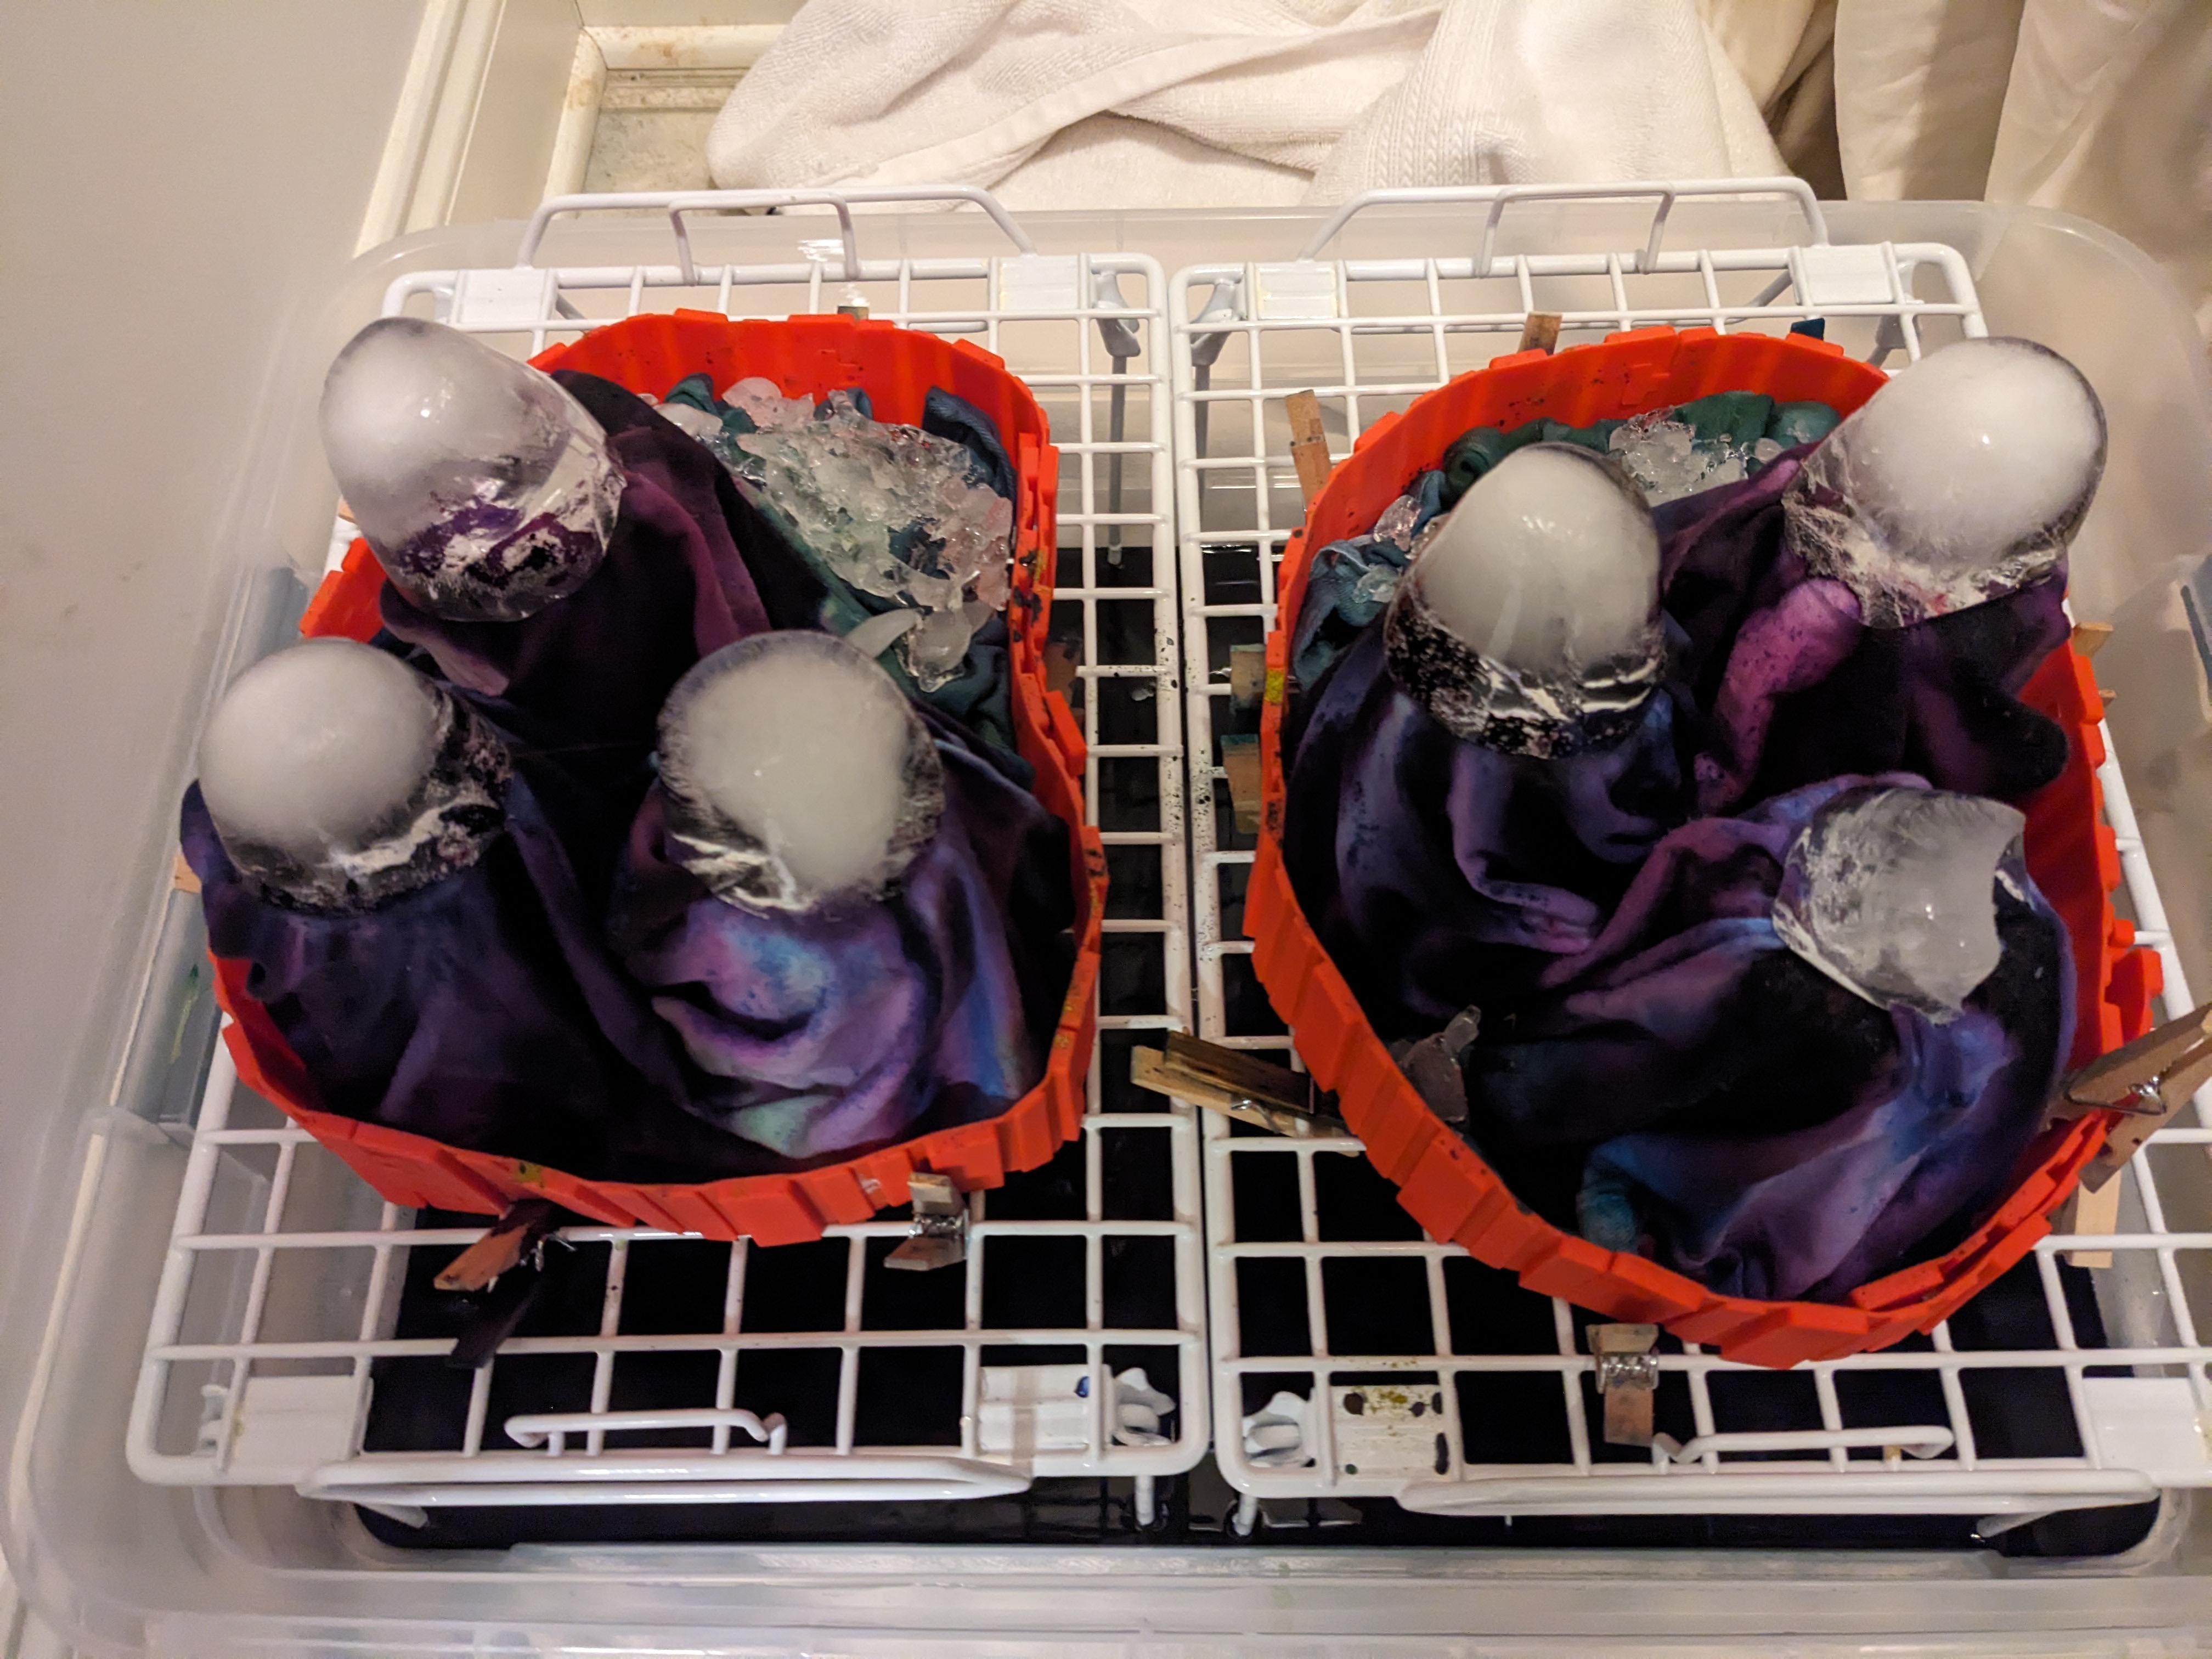
10. Processing ("Batching"). Now is the hardest part. Waiting and watching. I know it's hard to do - but you need to leave it alone while the first batch of ice melts. Once it has melted, look at the fabric. Has the dye for the flowers made it all the way down to the bottom of the cups? Is there still powdered dye on top of the cups? Has the background dye spread all through those areas? Is there powdered dye still visible on any of that fabric? Chances are that you will see some powdered dye in some areas. You'll probably also want the dye to travel down the flowers a little more. If either of these are the case, put another piece of big ice on the top of each flower and spread another layer of small ice on the background areas (1-1.5 inches should be enough).
Now, I need to say that if it is very warm - 90s and above - the ice may melt very quickly. If it does, the ice may melt faster than the dye can flow. If it is too warm, you may need to put on a 3rd layer of ice to give the dye time to reach its destination. Also, the fabric needs to stay damp for the entire batching time. If it appears to be drying out, cover it with a tent of plastic, the top of the tote (if it will fit), or cover it with another tub or tote.
Processing ("Batching") Times: The times listed here are generalizations and are the minimum amount of time AFTER the last ice has melted and the fabric has come up to the "room" temperature. Temps in the 70's - minimum 24 hrs. Temps in the 80's - minimum 16 hrs. Temps in the 90's and higher - minimum 12 hrs.
I prefer to process my items for a total of 48 hours or more. It usually takes about 12 hours for the ice to melt and the fabric to get up to temperature. Then I give it 36 hours or more to process (or "batch"). I would prefer to give it more time than to risk a poor outcome because I rushed it.
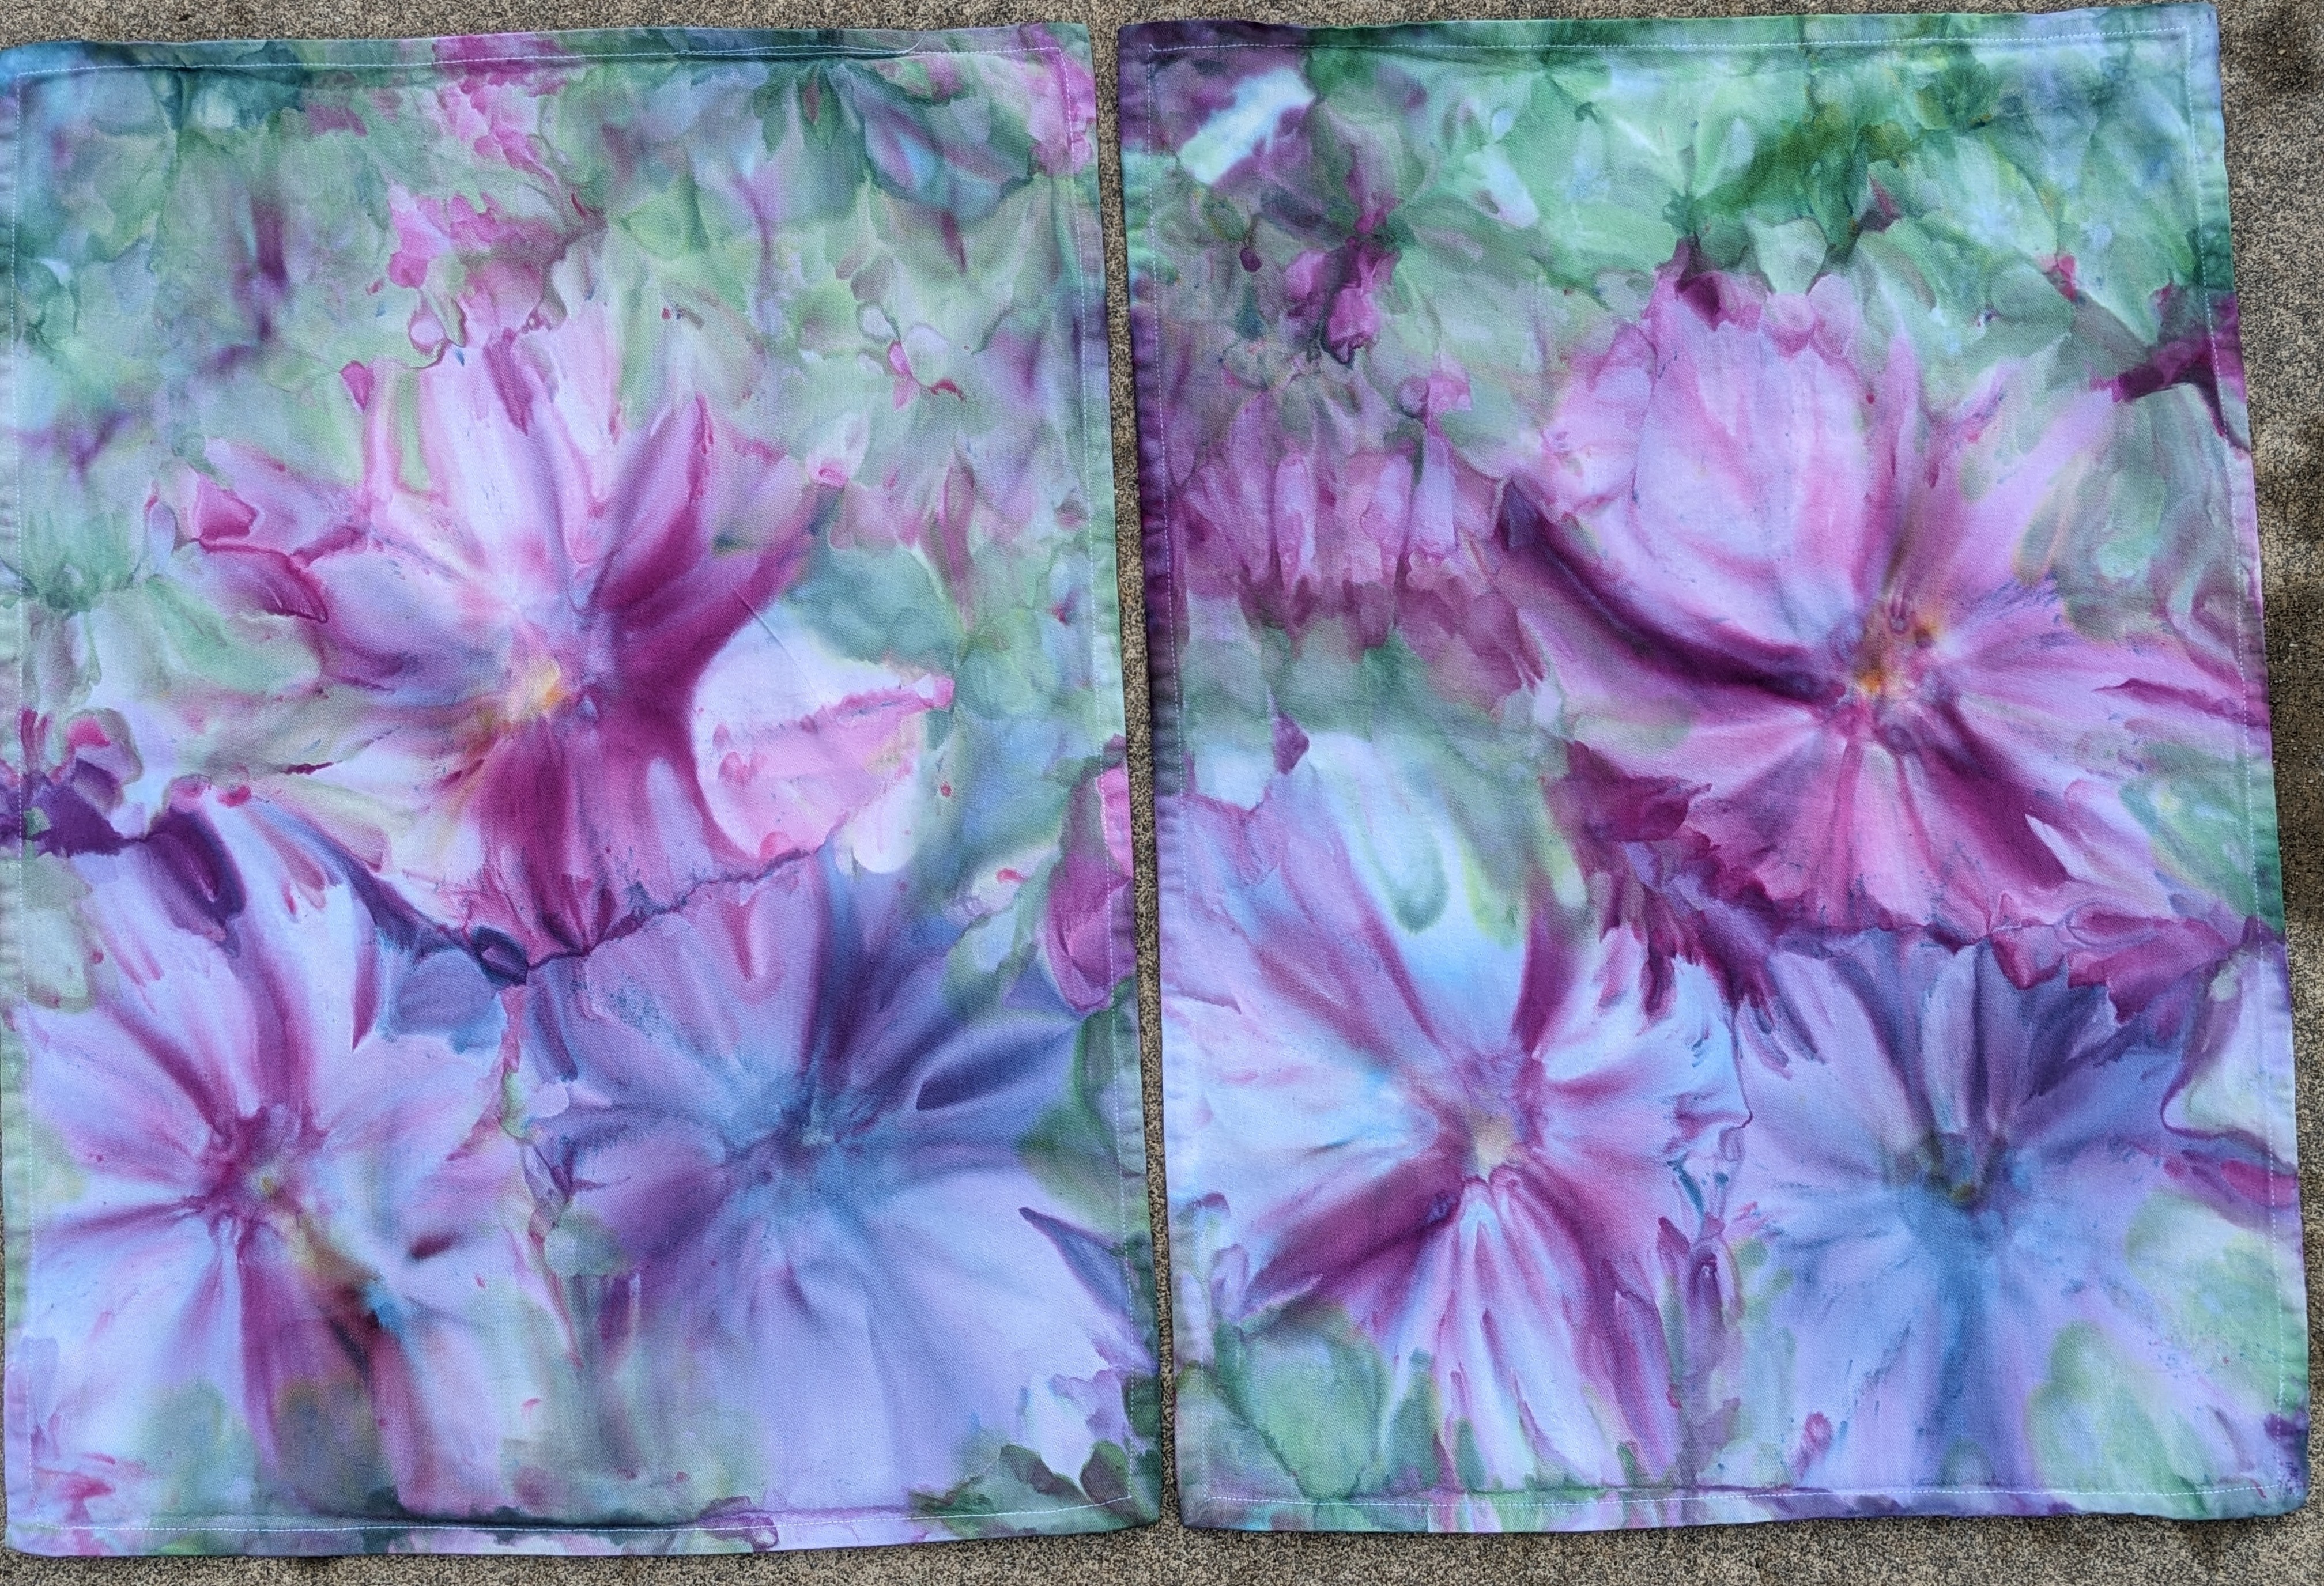
11. Rinsing and the Big Reveal. After enough time has passed. You will need to rinse, wash, and dry the fabric. Carry the fabric to the sink and begin rinsing it in cold water. Rinse it until the water runs almost clear. Then begin to warm the water while continuing to rinse (squeezing, opening, rinsing, repeating). Finally, rinse in hot water until it runs almost clear. Then you can wash the fabric by hand or in the washing machine - in very hot water with just a little bit of synthrapol, blue Dawn dish detergent, or other PH neutral detergent. If you used red, blue, purple, or turquoise dye, you should consider adding super heated water to the wash water (to obtain 140-160 degrees). These colors are particularly difficult to get completely rinsed out. The super hot water helps loosen all the excess dye from the fabric so you don't have to be as concerned with color bleed in future washes. If you see that the fabric is still bleeding during the washing, consider soaking the fabric in hot water & synthrapol (or blue Dawn dish detergent) for 20-30 minutes. If you still see color in the water, let it continue to soak for another 20 minutes and then rinse it out and soak it again. Continue to do this until it doesn't bleed anymore. Once you have thoroughly washed and rinsed the fabric, hold it up & show it off. You did it! Dry the fabric - in the dryer or hang it up. Once it's dry, head over to the iron and give it a good pressing. You don't have to but, I promise you, it will look even more awesome when you do. Take pictures and show it off to all your friends and family. AND please post a picture down in the comments - or send it to my email. I'd love to see what you created!!!!
Rinsing the fabric - why start with cold and then warm it up to hot? There is a real reason for it. Cold water keeps the fabric fibers closed and rinses away the excess dye. Hot water (above 120 deg F) opens the fibers and rinses away any loose unbonded dye. If you only rinse in cold water, the excess dye inside the fibers will not be rinsed away. If you only rinse in hot water, excess dye may migrate and bond in areas where you don't want it (like dark green in the pink flower petals). Also,if you don't thoroughly rinse and wash the fabric, you will likely experience color bleed in subsequent washes. But even the best work will sometimes bleed, so always wash dyed items with dark colors and don't let them sit too long before drying them (at least with the first few washes). If you don't have enough items for a dark wash load, throw a color-catcher (or 2) in the washing machine. Those things are great - they "catch" the excess dye in the water and help protect the other items from bleeding mishaps. (You can find color-catchers in almost all laundry detergent aisles.)
Comments